
Thursday, September 30
Coming soon.....the Fall into Fall Giveaway!
It begins in just a few hours. Be sure to stop by and check out the charming giveaway that you could win with just one comment! :-)
"Flavors of Fall Retreat"
This is Villa~Maria where my daughter and I hosted our quilting retreat ..............
 It's a beautiful building nestled in the woods near the little town of Frontenac, Minnesota. It was a former Catholic girls school that now serves as a retreat and conference center. It is one of the most peaceful places I have ever had the privilege to visit. To be able to spend the weekend there with friends and fabric is a real gift. :-)
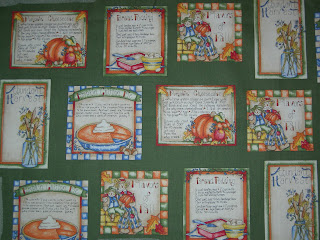
Speaking of gifts, I always leave little gifts in each of the rooms. Everyone got a little sack tied with ribbon that contained some goodies.....and then a few caramels tied up in Halloween fabric.....and a welcome card. My roommate was Jane. And yes, I made a goodie bag and welcome card for me, too. :-) If you double click on the photo, you'll see that the card says "Flavors of Fall". I fussy-cut the pieces from the fabric in the photo below, then used fusible web to iron them on the cards. The fabric has been in my stash for some time and when I came across it a couple years ago, I knew it would be the theme for our next retreat!
 With a theme of "Flavors of Fall", you know it means food is on the agenda. Collette and I prepared a warm, comfort meal because that's what we think of when Fall rolls around. The days get shorter and I love to put something in the crockpot or a casserole in the oven. So that we could enjoy a comfort meal at our retreat, I prepared the ingredients at home and then we used the crock pots to cook it.
 It's a beautiful building nestled in the woods near the little town of Frontenac, Minnesota. It was a former Catholic girls school that now serves as a retreat and conference center. It is one of the most peaceful places I have ever had the privilege to visit. To be able to spend the weekend there with friends and fabric is a real gift. :-)
Speaking of gifts, I always leave little gifts in each of the rooms. Everyone got a little sack tied with ribbon that contained some goodies.....and then a few caramels tied up in Halloween fabric.....and a welcome card. My roommate was Jane. And yes, I made a goodie bag and welcome card for me, too. :-)
 If you double click on the photo, you'll see that the card says "Flavors of Fall". I fussy-cut the pieces from the fabric in the photo below, then used fusible web to iron them on the cards. The fabric has been in my stash for some time and when I came across it a couple years ago, I knew it would be the theme for our next retreat!
 With a theme of "Flavors of Fall", you know it means food is on the agenda. Collette and I prepared a warm, comfort meal because that's what we think of when Fall rolls around. The days get shorter and I love to put something in the crockpot or a casserole in the oven. So that we could enjoy a comfort meal at our retreat, I prepared the ingredients at home and then we used the crock pots to cook it.
 Once we had the meal going, we set up the sewing room. While we were doing that, friend, Connie, began making the beds. The Villa is dormitory style and each guest makes their own bed but when I began hosting my retreats, I liked the idea of making up the beds before the guests arrive. Connie offered to help and I was glad to say "yes, I would really appreciate your help".
Everyone had arrived by 5:00 p.m. so we moved up our dinner hour so we could get to the business of sewing! We also moved up the dinner hour because the chicken noodle hot dish had cooked much faster than expected. It was a little "crusty" around the edge but still tasted pretty good. It was served up with the rolls you see on the left.
 There was also a Tuscany Chicken soup concoction that was pretty tasty. I think it was the favorite of the two hot dishes. I'll share the recipes for both dishes and the bread
 There was also a Tuscany Chicken soup concoction that was pretty tasty. I think it was the favorite of the two hot dishes. I'll share the recipes for both dishes and the bread
 in a post next week.  There were other tastes to go with our meal.......
 carrots and veggie dip, sourdough bread (from Coburn's in New Prague that was delicious!), a lime jello concoction (I refer to some of the things I make as "concoctions" because I don't always use recipes.....I like to experiment), and lots of cookies!
 My daughter, Collette, found the cookies and they had a design pressed in chocolate on them that resembled Villa Maria. How sweet was that?!!
 When I'm shopping for my retreats, I am a dedicated "clearance/end of season" shopper. I am able to find all sorts of things to use for decoration, plus plates, napkins, etc. and all are bought when they go on sale. I'm able to do this because I set the dates for my retreats so far in advance. I only host a retreat about every year and a half so I have lots of time to find good buys! Sometimes I find things I can re-use, like the recipe box that held our tableware and a maple syrup pot that holds flowers (sorry they are artificial). The apples are fake but there were real ones on our snack table upstairs. There was apple juice to go with our meal, sodas, or one could make a cup of tea. :-) To add to the good smells, there were cinnamon and pumpkin scent candles from Yankee candle that were lit at each table. I love YankeeCandles !!! Sometimes, I tuck a candle in a favorite scent in a drawer just so I can open it and smell the deliciousness. :-)
 Here are the happy faces of my retreat friends.....left to right in the photo above......
  While the retreat I host is held south of Red Wing, MN, not one of us is from near that area. Most of us are from the Minneapolis area or just southwest of the cities. Sue moved to Iowa a couple of years ago but returns often to join us in our stitching fun. We all gather at the Villa because it is a place that my church women's group went to for retreats. I loved it then.....back in the early 1990's and I still love to retreat at the Villa today. I'll tell you more about each of my friends in my next post. We are all connected by quilting, of course. :-)
After dinner, there was a bit of clean-up and then it was time for a doorprize. I had marked the bottom of one of the little Halloween wrapped caramels with an X and someone would win a fat quarter pack. Only thing is that my X was so well hidden that the winner, Connie, missed it. When I asked if anyone had an X on their candies, everyone said no. Well, I knew different because I made sure that Collette and I didn't get it, so everybody checked again. And there it was.............
 Connie is pointing out how tiny the X is but it earned her the fat quarter bundle so she's happy. Who isn't happy when there is fabric involved? :-)
Everybody got busy sewing, except Collette and me. I was pulling some fabrics for a Saturday project and while I did that, I asked Collette to crochet me a Perle cotton chain for a Halloween bead necklace. I never learned to crochet or knit. I am so glad that my daughter can crochet!
 The finished necklace will show up in the next post, along with pictures of everyone sewing. Nobody stayed up really late. We were all anxious to get a good nights sleep so we would be ready for a full day of sewing on Saturday. :-) I was so excited to be at the Villa that I couldn't fall asleep. Happens every time on my first night at retreat. I caught up on lost sleep on Monday. :-)
 There were other tastes to go with our meal.......
 carrots and veggie dip, sourdough bread (from Coburn's in New Prague that was delicious!), a lime jello concoction (I refer to some of the things I make as "concoctions" because I don't always use recipes.....I like to experiment), and lots of cookies!
 My daughter, Collette, found the cookies and they had a design pressed in chocolate on them that resembled Villa Maria. How sweet was that?!!
 When I'm shopping for my retreats, I am a dedicated "clearance/end of season" shopper. I am able to find all sorts of things to use for decoration, plus plates, napkins, etc. and all are bought when they go on sale. I'm able to do this because I set the dates for my retreats so far in advance. I only host a retreat about every year and a half so I have lots of time to find good buys! Sometimes I find things I can re-use, like the recipe box that held our tableware and a maple syrup pot that holds flowers (sorry they are artificial). The apples are fake but there were real ones on our snack table upstairs. There was apple juice to go with our meal, sodas, or one could make a cup of tea. :-) To add to the good smells, there were cinnamon and pumpkin scent candles from Yankee candle that were lit at each table. I love YankeeCandles !!! Sometimes, I tuck a candle in a favorite scent in a drawer just so I can open it and smell the deliciousness. :-)
 Here are the happy faces of my retreat friends.....left to right in the photo above......
 Deb, Jane, Sandie, Gretchen, Pat, Sharon and Laura.
And in the photo below......left to right......
Connie, Yvonne, Carol, Arlis, Sue, Carol, and Collette. We were all ready to eat and just very happy to be together!
 While the retreat I host is held south of Red Wing, MN, not one of us is from near that area. Most of us are from the Minneapolis area or just southwest of the cities. Sue moved to Iowa a couple of years ago but returns often to join us in our stitching fun. We all gather at the Villa because it is a place that my church women's group went to for retreats. I loved it then.....back in the early 1990's and I still love to retreat at the Villa today. I'll tell you more about each of my friends in my next post. We are all connected by quilting, of course. :-)
After dinner, there was a bit of clean-up and then it was time for a doorprize. I had marked the bottom of one of the little Halloween wrapped caramels with an X and someone would win a fat quarter pack. Only thing is that my X was so well hidden that the winner, Connie, missed it. When I asked if anyone had an X on their candies, everyone said no. Well, I knew different because I made sure that Collette and I didn't get it, so everybody checked again. And there it was.............
 Connie is pointing out how tiny the X is but it earned her the fat quarter bundle so she's happy. Who isn't happy when there is fabric involved? :-)
Everybody got busy sewing, except Collette and me. I was pulling some fabrics for a Saturday project and while I did that, I asked Collette to crochet me a Perle cotton chain for a Halloween bead necklace. I never learned to crochet or knit. I am so glad that my daughter can crochet!
 The finished necklace will show up in the next post, along with pictures of everyone sewing. Nobody stayed up really late. We were all anxious to get a good nights sleep so we would be ready for a full day of sewing on Saturday. :-) I was so excited to be at the Villa that I couldn't fall asleep. Happens every time on my first night at retreat. I caught up on lost sleep on Monday. :-)
 More retreat fun in my next post. Plus, there's a fall giveaway coming up on Friday so stay tuned!
Sandi
Sandi
Tuesday, September 28
Flooding in Henderson
My retreat pictures are coming next but first I thought I'd share a few pictures of the places that the Minnesota River has flowed into where it should not be!!! Those rains from last week filled creeks and streams that flowed into the Minnesota River which flows just to the east end of Main Street in Henderson. Slowly the flood waters have been moving our way. Highways are closed to the north, to the south and to the east due to water over the roads. In the photo below, it may look like a lovely lake. Not so.......
 This is the curve in the road at the north end of Henderson. Under that water is Hwy. 6, which is part of the ScenicByway through the Minnesota River Valley. The road is a favorite of motorcyclists who often do fundraising rides along the route. Currently, the only travel on it would be by boat.
 In the photo above, you can see the flood gates are in place to hold back the water. This is looking north, and yes, the Minnesota River flows north. Look at a map and you will see that it flows south and then turns and flows north up toward the Twin Cities where it eventually flows into the Mississippi. The flood gates and levee system were installed in the early 1990's because Henderson often suffered from spring flooding.
In the photo below, you are looking east..........
 This is the bridge on Hwy. 19, a main route for east to west traffic. The water is above the bottom of the bridge and it is over the road on both sides of the bridge. Last March we had flooding here from the snow melt. It was bad then but this is worse. There was no flooding on the west end of the bridge last March.
This photo is the south end of Henderson. I am standing on the earthern berm/levee that holds all that water back. That stop sign in the center of the photo is where we make a right turn to go to Mankato to shop or see our daughter. You can see by the street sign just how deep the water is.
 There are small farms tucked up along the hillside along the five mile stretch of this highway 93 that goes south. They are not necessarily flooded but they are stranded as if they were on an island. It could be a week before the water will recede enough for them to leave their homes and farms.
 As I mentioned earlier, all this water is still headed toward other communities.......Belle Plaine, Jordan, Shakopee, Savage.........and on to St. Paul and the Mississippi. Fall flooding is really unusual. Two major floods in one year is unusual. It was a long, hot summer. I sure hope this doesn't mean a long, cold winter. Oh, wait, that wouldn't be unusual for Minnesota. And in case, you are wondering, we live up on a ridge where we are high and dry. I always worry more about wind where we live but the reward of living up here is the beautiful sunsets we can see and the dairy farm across the way and the sound of the cows in the spring.........it is all music to my ears and so much better than the sound of traffic where we used to live!
Wherever you are I hope your weather is perfect!
Wherever you are I hope your weather is perfect!
As you can see, I was able to load photos with help from my husband. The new system for accessing my photos works better than the old one. I just didn't do it right yesterday. :-) Next post is all retreat and quilty fun!
Sandi
Monday, September 27
"What's on the line?"
Some of you are looking at this and thinking......I've seen this quilt before..........
 And you have! I featured it a couple of times and most recently in this post. Just click on...... vintage*quilt ........ and you can read the story behind the quilt.
 And you have! I featured it a couple of times and most recently in this post. Just click on...... vintage*quilt ........ and you can read the story behind the quilt.
 As I was assembling items to take to our retreat at Villa Maria, I decided I would take this quilt along since I received it as a gift from Carol at the Villa. She handles all the lodging arrangements for guests. I had this plan that I would take her quilt out and hang it on a clothesline or a tree branch. But then Friday dawned rainy and windy so there was no picture taking that day. Saturday was not very sunny but I did squeak out of the sewing room for a quick walk outside with my daughter and snapped a few pictures of a really beautiful tree that you'll get to see later this week. The sun that greeted us on Sunday morning was almost blinding, but it was awesome. It made for great picture taking for our group photo, Carol's quilt, and lots of pictures of trees and Lake Pepin, too. I would love to begin sharing those photos but I have a "glitch". Last weekend when I had all that computer trouble, my husband changed how I access and then download photos. I can get at photos I've taken in the past but something's not quite right as I can't download photos from my camera. Soooooooooo, that's why you are seeing that photo above for another time! I'll have to get his help after he gets home from work on Tuesday evening. I don't think he'd appreciate it if I woke him for help right now.
Today didn't go like I thought it would.......my dog has allergy issues again and needs frequent TLC. I was on the phone alot today and that's okay....my mom, my neighbor (Hi Kathy), my daughter......all caught up with everyone. Also caught up with most e-mails. Can't say the same for the laundry and there is still some retreat stuff left in my car.
Late this afternoon, I did a "milk run" and while I was downtown, I checked out the water levels on the Minnesota River that runs along the east end of Henderson. It is very high and when the photos are loaded, I'll share pics of just where the water is that it shouldn't be. The rain that is causing this flooding happened last Thursday. It fell in southwest/southcentral Minnesota towns and filled creeks and streams. These in turn flowed into the Minnesota River and now the water is higher than it was during the winter snow melt flooding that occurred at the end of March! I'm going to check out the water levels again tomorrow as it has not reached it's crest here in Henderson, yet.
I'll be back again with a post on Wednesday morning. See ya then!
Sandi
The winner of the extra goodie bag from my retreat is Nancy/Stitched with Prayer. She has sent me her address and her goodie bag will go in the mail at the end of this week. She left this lovely comment....... We visited our favorite Fall location just yesterday afternoon. We drove the 15 minutes from our house up to Snow Basin Loop, a road that takes you to Snow Basin Ski Resort here in Utah. *Some of the 2002 Winter Olympic Events were there* But there is a little two lane road that just loops down into the mountains and up onto the mountain tops giveing you a wonderful panoramic view of the Fall foliage. It is not quite at it's peak in color yet but very close and the drive was breathtakingly beautiful. We have driven it every year for as long as I can remember. Have a wonderful time at your Retreat!
Sunday, September 26
Nothing on the line yet.......
because I just got home from our retreat about two hours ago and I am still trying get unpacked and then off to bed. We had a wonderful retreat weekend and I have photos so you can all see the fun and the quilts. I've not had time to download photos and within ten minutes I am planning to "hit my pillow" for a good night's sleep. :-)
Last Thursday's torrentail rain led to major flooding that has made travel in our area very difficult. Here in south central Minnesota, our major highway 169 is now closed for a 22 mile stretch due to encroaching flood waters! I don't ever remember flood waters invading some of the areas that are now being inundated with water and the worst part is that the water is still rising, due to crest sometime Monday. Our little town of Henderson, is now accessible only from a highway to the west (just like it was in March when the snowmelt happened so fast). The highways to the east, south and north are all covered by water in various stretches of the road. In order to get home tonight, Collette and I had to take a detour along back country roads but police or county workers were out with lights and such to guide drivers along the alternate route. I just feel so badly for all these people who have lost their homes or businesses that are up to their windows in water and so much more. I feel almost guilty about writing about the great time we had at our retreat but then again, it might make someone smile. So, later on Monday, after the rest of the retreat stuff is unpacked and the photos have been downloaded to my camera, I will do my "what's on the line?" post and a little bit of our retreat fun. :-)
Off to get some much needed sleep right now!
Sandi
Friday, September 24
Off to our retreat!
Thank goodness it's Friday and we are headed to our retreat at Villa Maria. My daughter and I are headed east toward the Mississippi River and the scenic area south of Red Wing, MN. Villa Maria sits in the woods just south of the little town of Frontenac, MN and it is such a beautiful area. I'll have lots of photos to share when we return. While I'm gone leave me a comment about your favorite place to visit in the fall and you might be the winner of the extra little goodie bag that I have prepared. My daughter and I will be hosting thirteen of my friends so I made 15 goodie bags and one extra just for one of you. I'll get my random number man to draw a winning name on Sunday evening after I return and have unpacked. He'll be staying home to take care of the dog. I've left some food goodies in the fridge for him so he will survive while I'm away. LOL!
Winner of the goodie bag will be announced on Monday in my "What's on the line?" post.
See you then. Hope you all have a great weekend!
Sandi
Winner of the goodie bag will be announced on Monday in my "What's on the line?" post.
See you then. Hope you all have a great weekend!
Sandi
Thursday, September 23
Autumn arrives!

In just a few hours, autumn makes it's arrival here in Minnesota. The colors of autumn are just so glorious. Proof is in the color of those leaves in the photo collage above. I gathered those leaves in 2008 after a brief rain and then laid them in the grass and took a photo of each. I ended up with photos of about 20 of them and liked these six the best. Flowers in spring are vibrant and bright but what Mother Nature does to a leaf and the way it changes from green to golden or red or rust or a mix of all of them...........well, it's just glorious! I know, I already said that. The leaves are just beginning to turn here in our neighborhood and in a couple of weeks they should be pretty enough for pictures again. At least I hope so. Waves of heavy rain have marched across the southern part of our state and also brought wind and hail. It's really wierd weather for September!! Some trees may lose their leaves before they can turn naturally. In the southwest corner of Minnesota some communities are experiencing flooding. It's not exactly a good start to autumn. My grandpa always said, though, that you have to have good moisture in the ground as you go into winter so maybe that's what this is. I sure hope so.
The rain is expected to continue into Saturday so when we go off to our retreat at Villa Maria it will be very wet. We won't mind the rain at all as we'll be too busy sewing and catching up on news between old friends. All my goodie bags and favors for our guests/friends are lined up on my dining room table and ready to be loaded into the car. My daughter will be here at 9:00 a.m. Friday morning and off we go. I'll share pictures of our fun weekend next week. And my Monday feature....."What's on the line?" is also "going on the road". You'll see what I mean on Monday's post. :-)
Have a great weekend!
Sandi
Be sure to check out the tutorial for my "Candlelight" candlemat. There's another tutorial coming next week that will use the 2" strips that I didn't use in the candlemat project. Isn't it amazing what one can do with a bit of fabric. :-)
Wednesday, September 22
Sweet Candlelight! Introduction
I shared a "sneak peek" last week of a quilty project that I made. Today, I'm sharing the whole thing and while it's not a large project, it was really fun to make! It's a candlemat that I designed for Michele over at Quilting~Gallery. She will be using this as the project for her Fall Swap. Fabrics in the piece are from an "Adoring" charm pack by Sandy Gervais for Moda. And, for my readers out there that aren't quilters...... a charm pack is a collection of pre-cut 5" squares of fabrics from any particular fabric line. Moda provides lots of fabrics in charm square collections and more. I call this piece "Candlelight"................ The design blossomed this past summer when I began playing around with some charm squares in 30's fabrics. I could see a candlemat that would allow me to enjoy a little bit of all the fabrics and it would make a nice gift or retreat project. So I drew up a sketch, then I began charting my measurements and had to change my sketch. :-) This was my "prototype"..............
 I haven't done the binding on it yet because I was more interested in making sure my measurements were accurate so I wanted to make another one to double check my measurements (math has never been my best subject). I bought another Moda charm pack..... "Awesome" and again from Sandy Gervais. The bonus in the design of this project is that one charm pack will make two candlemat tops. I chose these fabrics for the first one. When it's quilted and bound, I'm going to add those autumn leaf buttons.
 In the second version, you can see that the center and the side strips are the same but the corners and fabrics around the center are different. Most charm packs have enough variety to allow you to do this. If not, I'll bet you can find pleasing fabrics in your stash that will go well with any charm pack. :-)
 After making three samples, I decided I was ready to cut into the "Adoring" charm pack. Here's the finished top before I quilted it. I originally planned to use linen for the backing but my linen was not the right color so I used a Kona cotton for the binding that had a linen look. As you can see in the first photo, the binding stays in the background and lets the fabrics "pop".
 These are not traditional Christmasy colors but there was something about them, that really caught my eye. I think it was the turgoise. My mother-in-law, Ora, would have loved it. She had turgoise appliances in her kitchen when they built their house in the 1950's. I could not believe it when my husband took me to meet his parents for the first time in 1968. Her kitchen was awesome and I adored it! (Karla and Connie........do you remember Ora's kitchen?)
 The design blossomed this past summer when I began playing around with some charm squares in 30's fabrics. I could see a candlemat that would allow me to enjoy a little bit of all the fabrics and it would make a nice gift or retreat project. So I drew up a sketch, then I began charting my measurements and had to change my sketch. :-) This was my "prototype"..............
 I haven't done the binding on it yet because I was more interested in making sure my measurements were accurate so I wanted to make another one to double check my measurements (math has never been my best subject). I bought another Moda charm pack..... "Awesome" and again from Sandy Gervais. The bonus in the design of this project is that one charm pack will make two candlemat tops. I chose these fabrics for the first one. When it's quilted and bound, I'm going to add those autumn leaf buttons.
 In the second version, you can see that the center and the side strips are the same but the corners and fabrics around the center are different. Most charm packs have enough variety to allow you to do this. If not, I'll bet you can find pleasing fabrics in your stash that will go well with any charm pack. :-)
 After making three samples, I decided I was ready to cut into the "Adoring" charm pack. Here's the finished top before I quilted it. I originally planned to use linen for the backing but my linen was not the right color so I used a Kona cotton for the binding that had a linen look. As you can see in the first photo, the binding stays in the background and lets the fabrics "pop".
 These are not traditional Christmasy colors but there was something about them, that really caught my eye. I think it was the turgoise. My mother-in-law, Ora, would have loved it. She had turgoise appliances in her kitchen when they built their house in the 1950's. I could not believe it when my husband took me to meet his parents for the first time in 1968. Her kitchen was awesome and I adored it! (Karla and Connie........do you remember Ora's kitchen?)
 So now you know all about this little project soooooo.........read on for instructions and you can make it. You'll find the PDF instructions at Quilting~Gallery so you can follow those and with photos to guide you this should be a quick and easy project to stitch. Have fun!!
Sandi
Candlelight Candlemat - Part 1
Hello and welcome to this on-line tutorial for my "Candlelight" candlemat. Some of you are here because you are participating in Michele's Quilting Gallery Fall Swap. Some of you are here because you come by most days and I love to see you visit. Whether you participate in the Quilting Gallery Swap or just make this candlemat for yourself, I hope you have fun doing it!! If I have missed any instruction/typos, please let me know! :-)
It's time to get started. A pdf file of written instructions can be found at QuiltingGallery. Please print those out and combined with the photo steps that follow, you should be able to stitch up a little candlemat in no time!! This design uses charm squares and you can either purchase a pack (42 or more) or cut an assortment from your fabric collection. :-)
The basic design for the "Candlelight" candlemat is shown below. You can use the guide shown above as you lay out your charm squares and see what pleases your eye. The charm squares used in this project are from Moda and are called "Adoring" by Sandy~Gervais. I drew the design first and then went shopping for a charm pack. Couldn't believe how perfect this charm pack was for my project! :-)
 Step 1. Select your fabrics. I like to lay them out in approximately the placement they will be in the actual project. You will use some fabrics in your charm pack, but others might not work.
 Step 2: Chose eight 5” charm squares that will form center section.
Step 3: To make this center section, you will make four half-triangle squares from the eight 5” charm squares you selected. Take two charm squares and place right sides together. Draw a straight line from corner to corner, then stitch a 1/4” seam to each side of this line.
 Cut squares along center line to make the triangles. Then open and press.
It's time to get started. A pdf file of written instructions can be found at QuiltingGallery. Please print those out and combined with the photo steps that follow, you should be able to stitch up a little candlemat in no time!! This design uses charm squares and you can either purchase a pack (42 or more) or cut an assortment from your fabric collection. :-)
The basic design for the "Candlelight" candlemat is shown below.
 You can use the guide shown above as you lay out your charm squares and see what pleases your eye. The charm squares used in this project are from Moda and are called "Adoring" by Sandy~Gervais. I drew the design first and then went shopping for a charm pack. Couldn't believe how perfect this charm pack was for my project! :-)
 Step 1. Select your fabrics. I like to lay them out in approximately the placement they will be in the actual project. You will use some fabrics in your charm pack, but others might not work.
 Step 2: Chose eight 5” charm squares that will form center section.
Step 3: To make this center section, you will make four half-triangle squares from the eight 5” charm squares you selected. Take two charm squares and place right sides together. Draw a straight line from corner to corner, then stitch a 1/4” seam to each side of this line.
 Cut squares along center line to make the triangles. Then open and press.
 Almost all seams are pressed open on this project unless noted otherwise.

 Trim each section to a 4-1/2” square.
 Sew top two squares together and then bottom two squares. Press.
Then sew the remaining two sections together.
 As you make these sections, you will be stitching centers for two candlemats.
 As I worked, I continued to place completed sections on my flannel board
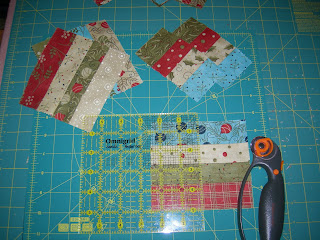
  My first cut was a 1-1/2" by 5" cut (I cut four charms at a time).
 My second cut was a 2" cut and the last cut was another 1-1/2" cut.
 You can select the fabrics for the strips that will border the center square

 Trim each section to a 4-1/2” square.
 Sew top two squares together and then bottom two squares. Press.
Then sew the remaining two sections together.
 As you make these sections, you will be stitching centers for two candlemats.
 You can use one to make a candlemat for you and one for a friend/swap partner.
Or stitch the second one into a potholder!
The remaining directions are written for one candlemat.
Double your number of strips, etc. if you are making two candlemats.
 As I worked, I continued to place completed sections on my flannel board
 so that I could keep my fabric choices in order.
Note: For the next steps, you will need 1-1/2” strips. I cut my charm squares into three strips.
Note: For the next steps, you will need 1-1/2” strips. I cut my charm squares into three strips.
 My first cut was a 1-1/2" by 5" cut (I cut four charms at a time).
 My second cut was a 2" cut and the last cut was another 1-1/2" cut.
 The 2” strips will not be used in this project. Save them for another one!
(And I do have another project coming up where you can use those 2" strips!)
 You can select the fabrics for the strips that will border the center square
 but do not stitch them yet.
You will stitch the side strips next.
Step 4: From sixteen charm squares, cut 1-1/2” x 5” strips.
 Place them in the order that please you!
 Press seams open.
 You will have four blocks of strip sets that measure 4-1/2" x 5".
  Continue to place your sections where you know you want them. :-)
 Step 7. Cut four 3-1/2” squares for your corner pieces.
Step 8. Cut four 1-1/2” squares. Mark a pencil line across the reverse side of each square.
 Place small square in one corner of the 3-1/2” square and stitch across this line. Fold back and you will have a triangle. You can trim away the extra corner fabric or leave as is.
 Step 9: Embellishment of corner square. You can leave this square empty or if you want to add embellishment in each corner square, you can use a cookie cutter or simple shapes to make a corner decoration. You can also “fussy cut” items from the fabrics that you are using as I did in my sample. Ornament shapes on my sample were done in traditional applique and began with a 1-3/4” cardstock circle template. I cut 2-1/4" circles and using a running stitch I sewed around the edge of the circle. I pulled the stitches tight and secured them. Make all four ornament circles and then press. Leave cardstock in place at this time.
 Next, I took a 1-1/4" piece of gold ribbon and gathered one edge of it to make the ornament cap. I pulled the gathering stitch tight which closed the ribbon and then I tacked it in place at the back of the ornament circle.
 After all four ornaments were stitched and "caps" added, I positioned the ornaments, pinned in place and did a slip-stitch around the edge of the circle.
When your corners are completed, you are ready for final assembly of the candlemat top.
 Step 10. Sew the side strips together. See photo below.
 When all four side strip sets are sewn together, press as shown in the photo below.
 Pressing in this way, will give you a smoother surface when the candlemat top is finished.
 You can see in the photo above that all side strips are sewn together.
 Step 11. Pin and then sew one side strip section to the right and left of the center section.
 Center section is stitched in photo above.
 Step 12. Sew corner squares to right and left of the top and bottom strip sections. In the photo above, this has been completed and you now have three sections remaining to stitch together.
Flip these sections over and press. Refer to photo below for pressing direction.
 In the photo below, I am demonstrating the "pin in the seam" technique that will allow you to have perfectly aligned corners. It works most of the time. :-)
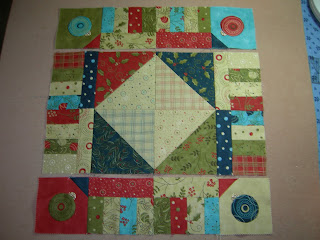
 When all three sections are sewn together, your finished candlemat top
You will stitch the side strips next.
Step 4: From sixteen charm squares, cut 1-1/2” x 5” strips.
 Place them in the order that please you!
 I changed my mind more than once as I made my candlemats.
Sew these strips together in sets of four so that you have four blocks that measure 4-1/2” x 5”.
Sew these strips together in sets of four so that you have four blocks that measure 4-1/2” x 5”.
 Press seams open.
 You will have four blocks of strip sets that measure 4-1/2" x 5".
 Referring to the photo above..........
Step 5: Cut each strip set in half and you will have eight strip sets
Step 5: Cut each strip set in half and you will have eight strip sets
that measure 2-1/2” x 4-1/2”.
 Continue to place your sections where you know you want them. :-)
Step 6. Select the eight 1-1/2” strips that you want to use to border your center triangle squares. Cut these eight strips to 4-1/2” length and sew one strip to each four-strip section.
Pay careful attention to how you want the fabric colors and
pattern direction to be placed in the candlemat.
At this point, I realized I missed taking a photo of one of the steps......the stitching of the 1-1/2" x 4-1/2" strips to the 2-1/2" x 4-1/2" strip set. I'll bet you can do it without a photo. :-)
 Step 7. Cut four 3-1/2” squares for your corner pieces.
Step 8. Cut four 1-1/2” squares. Mark a pencil line across the reverse side of each square.
 Place small square in one corner of the 3-1/2” square and stitch across this line. Fold back and you will have a triangle. You can trim away the extra corner fabric or leave as is. Step 9: Embellishment of corner square. You can leave this square empty or if you want to add embellishment in each corner square, you can use a cookie cutter or simple shapes to make a corner decoration. You can also “fussy cut” items from the fabrics that you are using as I did in my sample. Ornament shapes on my sample were done in traditional applique and began with a 1-3/4” cardstock circle template. I cut 2-1/4" circles and using a running stitch I sewed around the edge of the circle. I pulled the stitches tight and secured them. Make all four ornament circles and then press. Leave cardstock in place at this time.
 Next, I took a 1-1/4" piece of gold ribbon and gathered one edge of it to make the ornament cap. I pulled the gathering stitch tight which closed the ribbon and then I tacked it in place at the back of the ornament circle.
 After all four ornaments were stitched and "caps" added, I positioned the ornaments, pinned in place and did a slip-stitch around the edge of the circle.
When your corners are completed, you are ready for final assembly of the candlemat top.
 Step 10. Sew the side strips together. See photo below.
 When all four side strip sets are sewn together, press as shown in the photo below.
 Pressing in this way, will give you a smoother surface when the candlemat top is finished.
 You can see in the photo above that all side strips are sewn together. Step 11. Pin and then sew one side strip section to the right and left of the center section.
 Center section is stitched in photo above.
 Step 12. Sew corner squares to right and left of the top and bottom strip sections. In the photo above, this has been completed and you now have three sections remaining to stitch together.
Flip these sections over and press. Refer to photo below for pressing direction.
 In the photo below, I am demonstrating the "pin in the seam" technique that will allow you to have perfectly aligned corners. It works most of the time. :-)
Step 13. Sew the three sections together.  Pin these sections carefully..........
 Pin these sections carefully..........
 When all three sections are sewn together, your finished candlemat top
 should resemble the one in the photo below..............
 Candlemat top is finished. Take a break. Next is quilting and binding.......
 Candlemat top is finished. Take a break. Next is quilting and binding.......
Subscribe to:
Posts (Atom)