
It's time to get started. A pdf file of written instructions can be found at QuiltingGallery. Please print those out and combined with the photo steps that follow, you should be able to stitch up a little candlemat in no time!! This design uses charm squares and you can either purchase a pack (42 or more) or cut an assortment from your fabric collection. :-)
The basic design for the "Candlelight" candlemat is shown below.
 You can use the guide shown above as you lay out your charm squares and see what pleases your eye. The charm squares used in this project are from Moda and are called "Adoring" by Sandy~Gervais. I drew the design first and then went shopping for a charm pack. Couldn't believe how perfect this charm pack was for my project! :-)
 Step 1. Select your fabrics. I like to lay them out in approximately the placement they will be in the actual project. You will use some fabrics in your charm pack, but others might not work.
 Step 2: Chose eight 5” charm squares that will form center section.
Step 3: To make this center section, you will make four half-triangle squares from the eight 5” charm squares you selected. Take two charm squares and place right sides together. Draw a straight line from corner to corner, then stitch a 1/4” seam to each side of this line.
 Cut squares along center line to make the triangles. Then open and press.
 Almost all seams are pressed open on this project unless noted otherwise.

 Trim each section to a 4-1/2” square.
 Sew top two squares together and then bottom two squares. Press.
Then sew the remaining two sections together.
 As you make these sections, you will be stitching centers for two candlemats.
 As I worked, I continued to place completed sections on my flannel board
  My first cut was a 1-1/2" by 5" cut (I cut four charms at a time).
 My second cut was a 2" cut and the last cut was another 1-1/2" cut.
 You can select the fabrics for the strips that will border the center square

 Trim each section to a 4-1/2” square.
 Sew top two squares together and then bottom two squares. Press.
Then sew the remaining two sections together.
 As you make these sections, you will be stitching centers for two candlemats.
 You can use one to make a candlemat for you and one for a friend/swap partner.
Or stitch the second one into a potholder!
The remaining directions are written for one candlemat.
Double your number of strips, etc. if you are making two candlemats.
 As I worked, I continued to place completed sections on my flannel board
 so that I could keep my fabric choices in order.
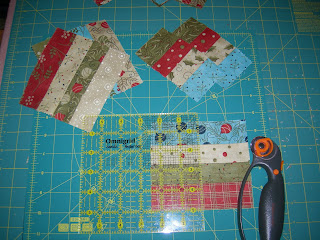
Note: For the next steps, you will need 1-1/2” strips. I cut my charm squares into three strips.
Note: For the next steps, you will need 1-1/2” strips. I cut my charm squares into three strips.
 My first cut was a 1-1/2" by 5" cut (I cut four charms at a time).
 My second cut was a 2" cut and the last cut was another 1-1/2" cut.
 The 2” strips will not be used in this project. Save them for another one!
(And I do have another project coming up where you can use those 2" strips!)
 You can select the fabrics for the strips that will border the center square
 but do not stitch them yet.
You will stitch the side strips next.
Step 4: From sixteen charm squares, cut 1-1/2” x 5” strips.
 Place them in the order that please you!
 Press seams open.
 You will have four blocks of strip sets that measure 4-1/2" x 5".
  Continue to place your sections where you know you want them. :-)
 Step 7. Cut four 3-1/2” squares for your corner pieces.
Step 8. Cut four 1-1/2” squares. Mark a pencil line across the reverse side of each square.
 Place small square in one corner of the 3-1/2” square and stitch across this line. Fold back and you will have a triangle. You can trim away the extra corner fabric or leave as is.
 Step 9: Embellishment of corner square. You can leave this square empty or if you want to add embellishment in each corner square, you can use a cookie cutter or simple shapes to make a corner decoration. You can also “fussy cut” items from the fabrics that you are using as I did in my sample. Ornament shapes on my sample were done in traditional applique and began with a 1-3/4” cardstock circle template. I cut 2-1/4" circles and using a running stitch I sewed around the edge of the circle. I pulled the stitches tight and secured them. Make all four ornament circles and then press. Leave cardstock in place at this time.
 Next, I took a 1-1/4" piece of gold ribbon and gathered one edge of it to make the ornament cap. I pulled the gathering stitch tight which closed the ribbon and then I tacked it in place at the back of the ornament circle.
 After all four ornaments were stitched and "caps" added, I positioned the ornaments, pinned in place and did a slip-stitch around the edge of the circle.
When your corners are completed, you are ready for final assembly of the candlemat top.
 Step 10. Sew the side strips together. See photo below.
 When all four side strip sets are sewn together, press as shown in the photo below.
 Pressing in this way, will give you a smoother surface when the candlemat top is finished.
 You can see in the photo above that all side strips are sewn together.
 Step 11. Pin and then sew one side strip section to the right and left of the center section.
 Center section is stitched in photo above.
 Step 12. Sew corner squares to right and left of the top and bottom strip sections. In the photo above, this has been completed and you now have three sections remaining to stitch together.
Flip these sections over and press. Refer to photo below for pressing direction.
 In the photo below, I am demonstrating the "pin in the seam" technique that will allow you to have perfectly aligned corners. It works most of the time. :-)
 When all three sections are sewn together, your finished candlemat top
You will stitch the side strips next.
Step 4: From sixteen charm squares, cut 1-1/2” x 5” strips.
 Place them in the order that please you!
 I changed my mind more than once as I made my candlemats.
Sew these strips together in sets of four so that you have four blocks that measure 4-1/2” x 5”.
Sew these strips together in sets of four so that you have four blocks that measure 4-1/2” x 5”.
 Press seams open.
 You will have four blocks of strip sets that measure 4-1/2" x 5".
 Referring to the photo above..........
Step 5: Cut each strip set in half and you will have eight strip sets
Step 5: Cut each strip set in half and you will have eight strip sets
that measure 2-1/2” x 4-1/2”.
 Continue to place your sections where you know you want them. :-)
Step 6. Select the eight 1-1/2” strips that you want to use to border your center triangle squares. Cut these eight strips to 4-1/2” length and sew one strip to each four-strip section.
Pay careful attention to how you want the fabric colors and
pattern direction to be placed in the candlemat.
At this point, I realized I missed taking a photo of one of the steps......the stitching of the 1-1/2" x 4-1/2" strips to the 2-1/2" x 4-1/2" strip set. I'll bet you can do it without a photo. :-)
 Step 7. Cut four 3-1/2” squares for your corner pieces.
Step 8. Cut four 1-1/2” squares. Mark a pencil line across the reverse side of each square.
 Place small square in one corner of the 3-1/2” square and stitch across this line. Fold back and you will have a triangle. You can trim away the extra corner fabric or leave as is. Step 9: Embellishment of corner square. You can leave this square empty or if you want to add embellishment in each corner square, you can use a cookie cutter or simple shapes to make a corner decoration. You can also “fussy cut” items from the fabrics that you are using as I did in my sample. Ornament shapes on my sample were done in traditional applique and began with a 1-3/4” cardstock circle template. I cut 2-1/4" circles and using a running stitch I sewed around the edge of the circle. I pulled the stitches tight and secured them. Make all four ornament circles and then press. Leave cardstock in place at this time.
 Next, I took a 1-1/4" piece of gold ribbon and gathered one edge of it to make the ornament cap. I pulled the gathering stitch tight which closed the ribbon and then I tacked it in place at the back of the ornament circle.
 After all four ornaments were stitched and "caps" added, I positioned the ornaments, pinned in place and did a slip-stitch around the edge of the circle.
When your corners are completed, you are ready for final assembly of the candlemat top.
 Step 10. Sew the side strips together. See photo below.
 When all four side strip sets are sewn together, press as shown in the photo below.
 Pressing in this way, will give you a smoother surface when the candlemat top is finished.
 You can see in the photo above that all side strips are sewn together. Step 11. Pin and then sew one side strip section to the right and left of the center section.
 Center section is stitched in photo above.
 Step 12. Sew corner squares to right and left of the top and bottom strip sections. In the photo above, this has been completed and you now have three sections remaining to stitch together.
Flip these sections over and press. Refer to photo below for pressing direction.
 In the photo below, I am demonstrating the "pin in the seam" technique that will allow you to have perfectly aligned corners. It works most of the time. :-)
Step 13. Sew the three sections together.  Pin these sections carefully..........
 Pin these sections carefully..........
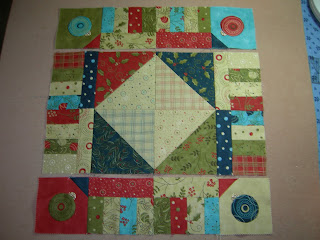
 When all three sections are sewn together, your finished candlemat top
 should resemble the one in the photo below..............
 Candlemat top is finished. Take a break. Next is quilting and binding.......
 Candlemat top is finished. Take a break. Next is quilting and binding.......
11 comments:
Awesome photo tutorial Sandi. Thanks for putting so much effort into making the Quilting Gallery swap super fun and easy for anyone to participate.
Awesome tutorial Sandi ..Thank you for sharing. I am putting a link to your blog on my side bar so I won't miss any of your posts :)
Great tutorial Sandi. You make everything look easy!
THanks for the tip of pressing seams open. I did try a candle mat afew years ago and the candle 'wobbled' on those uneven seams which I pressed to one side...I was very disappointed after having put the effort into that mat...I don't use it :(
I just love this project and your tutorial is wonderful. I have a couple of Holiday toppers to make and this will be just perfect. Thanks so much for sharing your talents.
Thank you Sandi for the great instructions. I can hardly wait to start the project.
OMG, this is so simple & easy I can't wait to get started. I to, know what it is like for memories I also have a pic just like this one & my Dad looked like yours. I always make HOME MADE gifts they mean so much more to the one receiving them. THANKS for all your time for putting this together to share.
I'm NOT a quilter, but I'd love to give this mat a try!
Hi Sandra, I'm a local lecturer and teacher in the St. Louis Metropolitan area and I run a monthly scrap quilting club. I was wondering if I could use your Candlelight Candlemat as our project for the month of May? I would link them to your blog and have them download the directions from your tutorial page. I think instead of making mats, I'd like them to make many blocks and put into a quilt top. Please let me know either way and I appreciate you taking the time to respond.
Hi Sandi
An awesome tutorial as usual, thanks for sharing a an opportunity to win.
Hi Sandi
An awesome tutorial as usual, thanks for sharing a an opportunity to win.
Post a Comment