

Cut two pieces of fabric 4-1/2" x 6-1/2"
Cut one yellow woolfelt piece 2-1/4" x 3"
Cut one green woolfelt piece 2-3/4" x 3-1/2"
Iron-on strawberry applique
Green Perle cotton thread and needle
Red thread and needle
Batting scrap that measures at least 4-1/2" x 6-1/2"
Quilt Basting Spray and Lapel Stick or Glue stick
Sharp scissors
Scrap of note paper and a marking pen
Small rule
Now you're ready to begin.........

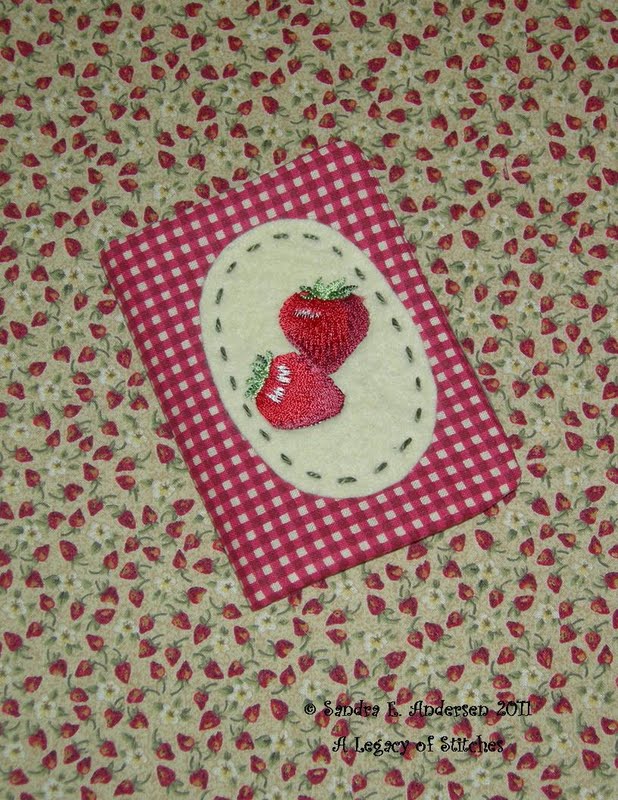
Next step is to make the oval for the front half of your needlecase. Cut a piece of paper 2-1/4" x 3". Fold it in half, then in half again. Draw an arc shape on the folded paper piece as shown in the photo below. Trim along arc, unfold pattern and pin to the piece of yellow woolfelt. Then cut oval from the yellow woolfelt.


Thread your needle with a length of green Perle cotton and sew a running stitch all around the edge of the oval as shown in the photo above.
Take the second 4-1/2" x 6-1/2" fabric piece and place it face down on the piece with the oval. Pin these two pieces together. I wanted rounded corners so I used the corner of the applique card as a template. A credit card will work, too. :-) Mark the corners with a pen.

Once you have sewn all the way around the needlecase pieces, you will mark an opening. With batting side down, you will mark 3/4" from the top as shown in the photo below..........

Then mark 3/4" in from the left side as shown above and then make a straight line from this point that is 1-3/4" long.


To turn needlecase "inside-out", insert your thumb into one corner and then push it out through the opening. This is hard to describe. Please refer to the photos below. :-)


Then turn it over and rub a bit of glue on each side of the opening you cut.

Time to apply the strawberry applique. I bought mine at Hancock Fabrics in Mankato. I checked on-line and they don't seem to have this one but I found a couple similar ones
here and here. Place a scrap of fabric over the applique as you iron it. Note: You could also cut strawberry shapes from wool or woolfelt or fussy-cut strawberries you might find in a cotton print fabric.

To press a crease in the needlecase, I folded it in half, then placed my small ruler inside and pressed with my iron.


Would you like to know who won the kit from the Strawberry pincushion tutorial? It's Deserae !!! I've sent her an e-mail and will get the kit in the mail to her on Monday. Now, Deserae wasn't the first winner. The first name I drew had no way to contact her. She had a profile, but no blog and no e-mail link. I'm going to tell you about another giveaway in just a minute but first, here's the info you need to add an e-mail link to your profile so that when you enter a giveaway you can be contacted when you win!
First, go to your blog and sign in.
Then click on "View my profile" on your blog.
On your profile page, click "Edit profile".
The "Edit Profile" page will come up and you want to scroll down to "Identity"
Enter your e-mail address where indicated, then scroll down and click "Save Profile".
Now go check your profile and your e-mail link should appear. This will allow readers to send you a private message and if you comment on other blogs and/or giveaways, those bloggers will be able to contact you.
So, I mentioned another giveaway and here it is..........

That's right. The pincushion and needlecase set that is shown in the photo above is going off to one of you that adds a comment to this post. How to enter.........
Leave a comment and tell me something about strawberries or a memory of summer food fun. You must mention strawberries or any other summer food. Include your e-mail if you are not a blogger or blog in another format. If there is no way to contact you, your name and comment will not be entered in the drawing. You have from now until Tuesday June 7th at 7:00 p.m. to get your name in the drawing. And if you stop by tomorrow, Sunday, June 5th there is going to be a really fun giveaway and then another one on Tuesday. I just want to make sure I celebrate my blog anniversary and show my appreciation to all of you that keep me blogging. :-)
Have a great day!
SandiEdit: The winner is..........Marcia/Mommarock who shared this strawberry memory..........
This is REALLY cute! you are so talented. I planted strawberries this year in my garden.. Bummer.. nothing grew.. I won't stop trying though.. maybe next year. I love strawberries :) Congratulations!!!!
26 comments:
Wonderful tutorial, Sandi. Thanks for sharing.
We live in an ag area and most of the strawberries shipped around the world come from our little corner of the world. The in ground berries start to ripen in February and are shipped off. We won't see the local berries in our atands until mid March or later.
This is REALLY cute! you are so talented. I planted strawberries this year in my garden.. Bummer.. nothing grew.. I won't stop trying though.. maybe next year. I love strawberries :)
My sister had a favorite childhood dress she called her "fraberrie" dress. Our mom had to let out the hem and finally add extension fabric (twice)until the material sort of disappeared before our eyes. The fabric was a simple cotton strawberry print on a white background. My entire remembers the several years of the "fraberrie" dress!
I love your tutorials - you do such a wonderful job of explaining. I remember as a child that our neighbors had strawberries in their yard and would let us come and pick them. We always ate them right away and never took any home. Wonderful opportunity. Thanks you so much. Judy C
You write such great tutorials Sandi!
Strawberries are a great summer fruit, but my favorite is raspberries! We have a few next to our garage that are great for a little snack, but usually pick every fall at a farm so I can make raspberry jelly!
Oh this is so cute! I do love strawberries in season, but here in Paradise, MI it's the wild blueberry capital. Wild blueberries grow all over our property, and many places near here, such a along the road. Blueberry pies! Can't wait. Yum! I might just have to go cut some strawberries from the fridge and put them on some ice cream, while I wait for blueberry season here.
Great tutorial! This year I planted 25 strawberry plants in my back yard. They are blooming now and some even have little baby strawberries popping out! I can't wait for them to grow bigger and turn red. :) MMMM Good!
Thanks, Sandi for the great tutorial! Love strawberries and used to go picking them with a friend where I used to live. Miss those times each spring. We'd pick lots of buckets and eat a few while picking, too. Then she'd go home and make jam and I'd go home and freeze mine. She'd always share a jar of her jam with me! Yum!
I love strawberries but my most favorite ones are covered in chocolate!
Hi Sandi,
Thank you for the great tutorials. I can hardly wait for strawberry seasons here as my husband goes and picks them so I will make strawberry freezer jam for him. The wild ones are the best but are getting hard to find.
Marge
mhuewe@redlake.k12.mn.us
Thanks for the great tutorial Sandi. We've been trying to grow strawberries but have had little success. First because the dog killed the plants & 2ndly not sure what happened to the next lot. Maybe too much water from the flooding rains we had. So we are trying again with fingers crossed as we love strawberries.
Wonderful tutorial - love both the needlecase and strawberry. My favorite strawberry memory is making strawberry freezer jam. My mother would make all five of us pick and clean the berries and then we made them into jam. When winter arrived, we would pull the strawberry jam out of the chest freezer and it would bring a little sunshine to the wintry days of Minnesota. Oh how I miss those days!
That is so cute. I love making strawberry pincushions.
dollartistcarla at aol dot com
What lovely items you finished up with after a great tut! I used to have strawberry milk from the milkman when on holidays as a child. It was a real treat! :)
I just picked strawberries yesterday. We have a small and manageable patch, but growing up I remember having to pick 3 loooooonnnngg rows. My Mom would make strawberry freezer jam, then only let us have it on special occasions!
It's strawberry time in Oregon, but they're pretty late due to our cold and rainy weather. It would be wonderful to win your strawberry pincushion and needlecase to add to my pincushion collection.
Thank you so much for the tutorial. It made me think of the strawberry cake that my Mom used to only make one of a year in the springtime. It was white cake, with this marshmallow type icing that she had to cook, she put halved strawberries in the middle of the cake on top of icing, and then covered then entire cake with the icing and halved strawberries. It was the most beautiful cake and so yummy. I miss Mom and her cakes!!
Thanks for the detailed tutorial - love it with all the step-by-step photos!! This year I want to plant some strawberries in a hanging basket... hopefully the chipmunks won't get them first!!
I, too, love strawberries. When I was in grade school, we lived on a farm with a huge garden. In a city, someone would build a house on it! Across one end was a wonderful bed of strawberries which had grown practically solid. After the picking season each year, my mother would dig out the oldest plants which did not give much fruit. We would eat strawberries almost every day for about a month, freeze sliced berries to eat during the winter, and make jam also. Plus there were enough to share with neighbors and family. I didn't much like standing bent over for a long time to pick them, but it was certainly better than picking blackberries, which I also love to eat. Blackberries ripen in the heat and humidity of late July and early August, and we wore long sleeves and denim to protect ourselves from the thorns.
The good old days, doing things with my mother.
Owl Lady
GBrewer@kc.rr.com
So cute, and thank you for the tutorial!
I love strawberries, and my favorite memory about strawberries is from my childhood. I could go in the hill behind our home and pick wonderful sweet wild strawberries and put them on a straw before eating them.
Strawberries always remind me of my Dad. From the time I can remember to the three years before his death, he had stawberry beds. In SW OK, they are hard to grow because of heat and little natural water (as rain water). He caught rain water in a large tub and saved it for his berries. He took trips out to the countryside to people he knew and asked for straw to tenderly tuck around the plants. They were his babies and he tended them well and we had a delicious bounty to eat each summer. Sarah
I remember the first time I ever picked strawberries. They were all so red and beautiful, that I just kept picking and picking. I can't remember exactly how many quarts, but I think I ended up with 25 or 30 quarts of berries. I had to learn really fast how to make jam ;-) Thanks for the adorable strawberry projects.
I love strawberries. Plain or over angel food cake or better yet with biscuits and milk. I love your needlecase and pincushion. Thanks for the tutorials!
Too adorably cute, Sandi! I love the red check and will have to look for some. Strawberries? I cut some up for my Cheerios every morning! And sometimes for midnight snack, too.
MMmmmm my Mums homemade strawberry jam, with freshly made scones (biscuits in your neck of the woods) and thick cream....my mouth waters just thinking of them! Hugs Naomi
How cute, Love love strawberries.
Post a Comment