Tuesday, June 28

Sewing some comfort..........

This past weekend, I took some time to sew something totally not related to quilting. It all started when I made curtains for the window in our basement family room. I found the fabric for those curtains in a box of decorator fabrics that I've bought the last few years. The curtain is a nice deep russet color and looks great in the window. It was not photo-worthy. :-) However, also in the box was a pretty floral remnant that I remembered buying a few years ago. I just had to use it for something but it didn't go with anything in any room of our house. And then I thought...........why not use it for a cushion for my front porch chair? And so I did and here it is..........complete with a little tabletopper made from the leftover scraps.

My husband tested the chair on Sunday afternoon and gave it the "seat of approval". :-)  Then yesterday, I tested it when I took my lunch out to the front porch and enjoyed the view. It was a bit windy but the view was lovely. Take a look...........

We have had a lot of rain lately but on Monday the sun was out all day and the clouds were beautiful.  Perfect summer day!
Just in case you have a plastic or a wooden lawn chair that you'd like to make a cushion for, here's how I started..........I took newspaper to the chair and placed it there, marked with a large marker the approximate shape of the back and the seat of the chair. Then I center those pieces over the larger floral design and cut them out.

I backed the cushion with a solid deep red fabric. Front and back pieces and the seat sections each got a piece of batting secured to them (I used quilt basting spray). Then I added the piping around the edge of each piece. I cut a two inch strip of fabric that became the sides and top. When the top was sewn together and the seat, too, I inserted a piece of one inch thick foam that I had cut to the shape of the initial paper pattern. It was interesting getting that foam placed just right. I had to trim the foam a bit but when I had it just right, I sewed the two sections together with one machine seam along the floral side and then I handstitched the back side closure. Amazingly, it all worked out, just as I could see it in my mind. I started the cushion on Saturday afternoon and finished it later Sunday afternoon.  I didn't spend all that time sewing because, I'll be honest.......I took numerous breaks. :-)  Granted, this was a bit of work for just a front porch chair but I wanted something lovely where I could sit and enjoy my lunch or read a book. Life has been just a wee bit crazy lately and I needed a place to sit and relax, a place where I can "think straight".   I made the little table topper on Sunday evening. There's a tie on it that secures it to the table. In the wind we had yesterday, it would have been gone had I not done that. I really enjoyed sitting in that comfy chair and enjoying my lunch. Oh, and the chair has a story. It was a birthday gift from my husband in 2004. Sometimes he misses birthdays but that year, he remembered that I wanted a chair for our small deck on our old house. He bought the chair and put it out on the deck before I got up on my birthday. I remember I went out to walk the dog that morning and almost didn't realize the chair was there. LOL! 
I really enjoyed making the chair cushion and wanted to do it for another reason than just comfort. I have a couple of chairs that I want to upholster and I needed to refresh my skills. It's been many years since I did any upholstery. I'm ready now but before I do the chairs, my next non-quilty project is making drapes for our upstairs bedroom. That project begins on Wednesday because today being Tuesday..........it's time for Tuesday Crazies. That's right, my crazy quilting friends will be here at 11:00 a.m. and we will enjoy some lunch and then stitch and chat away the afternoon. It's been a long time, since last fall I think, that we were all together to stitch. I'll have pictures to share, I'm sure........
Sandi

Monday, June 27

What's on the line?

I've got another green quilt to share..........

This one is rather interesting. The maker used four lengths of green cotton for the back and front of this quilt. She pieced two lengths that make up the front of the quilt and two for the back. The fan blocks were then appliqued in place. Usually, the fan blocks are made as individual blocks but not in this quilt.  Here's a close-up of one of the blocks.......

Hand-quilting has been done around each of the fans and remains mostly intact. The quilt also had other hand-quilting that criss-crossed the quilt but only remnants of the stitches remain. Some of the blocks are very worn, like this one below...........

This is not one that I will likely repair. Instead, I think it's one to make from new fabrics. Yep, it can go on my "never-ending to-do list". :-)  I have no date for this quilt but would guess that it is from the 1940's based on fabrics and wear.
I have a little swap item to share............
This is the bag I received from swap partner, Heather, in Michele's latest swap over at Quilting Gallery. I love 30's prints so this will make a great bag for toting a 30's project when I'm out and about this summer.
Speaking of "out and about", there's been a bit of that going on here and then some staying home, too. Getting some things done........like a curtain for the basement family room, cleaned a closet, and more. I'll show you one of those "more" projects tomorrow. I had to set aside the project that I was working on with my GO! Baby. Just too many family and summer things that needed my attention. So, when summer rolls around in your neighborhood, what keeps you the busiest? and do you find time to sew in the summer or read blogs, or do you do that more in the fall and winter? Just curious. I have some projects to share but if folks are busy with summer things, I might wait til August before I post some of them.
Have a good Monday!
Sandi

Wednesday, June 22

Wooly patchwork projects............

Yesterday was the first official day of summer according to the calendar. I should be working with summery fabrics but I got caught up in my wooly stuff and just had to play with it! Remember the shapes I cut while waiting for my mom at the doctor? Well, here they are on my vintage wool crazy quilt piece............

I used a fabric glue stick to adhere them to the wool and then basted them with white thread to hold in place. I wanted them in place so that I could just pick up this piece and stitch whenever I have time. I realized as I positioned the pieces that I need a few things.....a snowman, a pair of mittens, a log cabin, a teddy bear, a dog, etc. etc. My piece will not be very primitive. I just don't do primitive very well. Instead, I am sort of "grade school". LOL! I love my shapes, though, and so as long as I'm happy with what I end up with then that's all that counts!
Now, I also showed you, a wool piece that looked like this..........
Well, while I was at my mom's and we sat and chatted and watched TV........I was also stitching cross stitches on this wooly piece.........
I could see a small zippered case from this and so I thought I'd share a few steps in how I made it, once the piecing and cross stitch was finished. This is not a detailed tutorial like some that I've shared. Instead, it requires a free spirit, good sewing skills and is more of an "inspiration" tutorial. That's because sometimes, I like to take fabrics and just start cutting and stitching and see what develops. If you like to do this, then you may enjoy trying something similar with your wool (or cotton) scraps.
Once I had my basic piece stitched, I cut a piece from brown wool that was the same size. My particular case measures approximately 9" unfinished. I cut a strip of teal that was 1-1/2" x 9" and a strip of black that was about 4" x 9". I sewed the teal strip along the top of the pieced case section. I also cut two lining pieces and made them extra long at the top.
After I sewed the teal strip in place, I added the black strip of wool. Then I sewed the zipper in place. Again, I mention that this is not a detailed tutorial but merely the steps I took to make this case. There are many sites that share zipper tutorials.
Once the zipper was stitched in place, I folded the entire piece in half and stitched it together. Tip here.......leave your zipper open halfway so that you can turn the piece inside out.
When you turn the piece inside out, you can add the lining. I just slipped it in the case and in the photo above, the pins are holding the lining in place along the zipper. I hand-stitched this side and then when I was finished with that, I pinned the other side of the lining in place along the inside of the zipper. This is why this is not a detailed tutorial. Taking pictures of this step was almost impossible. One of those, "easier shown in person" type moments. :-)
Once that lining is hand-stitched in place, you can zip up your case and it will look like this ...........
And on the side with your wool patchwork, it will look like what you see in the photo above. This would be a good "hands-on" class project. I really felt after I got into it that it was easily completed but difficult to capture in photos. However, if the project offered you some inspiration then that is well and good!!
I've added this case to my sewing box and will keep scissors, needles and other sewing related items in it so I have it all handy when I'm stitching. I'm hoping to finish that wooly crazy quilt piece by the end of the summer. When Labor Day rolls around, I'll let you know if I succeeded or not. Summer is short here in Minnesota, so I am thinking those summery fabrics are at the top of my list for today. Next post.......I'll finally get to the "summery, tutti-fruiti made with my GO! Baby" project!!!
Back soon............
Sandi

Monday, June 20

What's on the line?

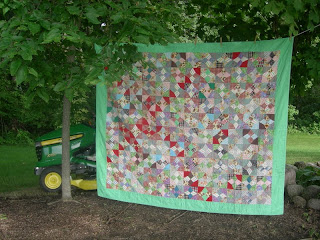
We have had a lot of rain lately and so the landscape is green and flowers are blooming everywhere! With green on my mind, I decided to pull this colorful quilt from the stack of quilts my dad bought at auction.  This one is so colorful that it almost looks like a garden of flowers...........

It's hand-quilted and at first glance one might think 1940's to 1950's. However, on close inspection, there is a fabric in the quilt blocks that makes me think the quilt may have been made in the 1960's to 1970's. It's the red and white heart print that you can see in the photo below..............

Most of the other fabrics look like they are from the 40's and 50's, some possibly from the 30's. But that red and white fabric just seems out-of-place. I checked the examples in the book Dating Fabrics, A Color Guide 1800-1960 and I did not find that red and white print so I am almost sure it is 1970's, maybe even 1980's. The real authority, though.........there's a bit of this fabric in my personal stash and I started "collecting" fabrics in the late 1960's. Regardless of the quilt's date, I think it's lovely because it is so scrappy and so colorful!

And since the subject is "green" today, I thought I'd share this picture.  While I was taking my quilt pics, my husband was mowing the lawn. When he circled around behind the quilt, I thought I'd snap the pic so it looked like he was pulling the quilt along behind his mower. I snapped too quickly. Oh, well.......
I was planning to share more on the wooly project I started when I was at my mom's and also the project made with my GO! Baby but I got busy with family and house stuff. It is, after all, summer. Lots to do outside and many things going on (like Sauerkraut Days next weekend).  I think my blogging may be a little sporadic this next couple of months due to family things and summer activities. However, I will always post on Monday with my What's on the line feature because I love to hang a quilt on the line. And that GO! Baby project ..........it's coming up in my next post.
That's all for today. Have a good one!
Sandi

Thursday, June 16

I'm back........

Late Tuesday afternoon, I returned from a few days in Iowa with my mom. She's having some health issues so I went down to see her to the doctor. My brother had been covering things so it was time I took my turn. I always pack a bag with all the clothes and stuff I'll need, but I also pack several projects to take along. Stitching keeps me relaxed. So, the first thing I put in the car to take along was my box of wool scraps that I am using to add embellishments to a vintage wool piece that my mother gave me.
 
When I got to the hospital to wait for my mom who was having a same-day surgery, I got out my box and was ready to stitch. Duh.......I opened the box and quickly realized that I'd left the vintage wool piece at home. New plan......I cut shapes to stitch to the wool piece later on. There were some other folks in the waiting room who looked like they wondered....."what is that woman doing?" However, no one asked. LOL!  I didn't use any patterns. I just cut shapes as if I was cutting pieces from construction paper. I'm looking forward to stitching them in place and seeing the wool piece come to life.
Later on that evening, while my mom dozed in her chair, I decided to take some of my scraps and make a little wooly item. I wasn't sure what it was going to be when I started. It began with a scrap of muslin that was in the box......one end was rounded, one straight. I folded the scrap in half and cut the straight end to be rounded. Then I began cutting bits of wool and basting them in place. I think it will become a case for scissors or maybe a wallet. More on this in my next post.

Yesterday, I caught up on laundry and sleep. :-)  Trying to catch up on my blog, then will get to my Yahoo groups. Just taking things one day at a time/one task at a time. :-)
Thanks for your concerns for my mom. She's doing pretty well.
Oh, and almost forgot.........I have notified the winners of the final giveaways for my blogaversary celebration. They are............
Deb at http://aspenhill.wordpress.com who won the 101 Fabulous Rotary Cut Quilts book.
Winner of my wool tulip penny rug kit is Sandy and the winner of the Joy of Quilting book is Nadine, known to me as Owl Lady. :-) Congrats, Ladies! I've sent you all a winning e-mail and when I get your addresses your prizes will go in the mail.
See you all tomorrow with some Go! Baby fun............
Sandi

Monday, June 13

What's on the line?

I hung this quilt on the line a week ago Sunday when I took the picture of the hexagon quilt that I shared last Monday.  It was such a lovely afternoon, perfect for taking pictures. This is such a sweet little doll quilt...........


I don't have any information on the maker of the quilt. And I don't even remember where I got it. I have this vague recollection that I got it at a thrift shop. This is why one should label quilts because memory does not last!!
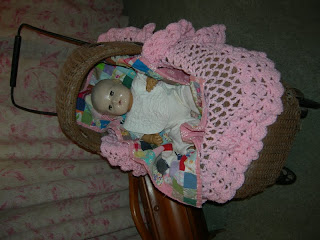
Then again..........memories of my high school music teacher, Mrs. Parr will last forever with me. She was THE teacher that was the most influential in my life. I've mentioned her before. She began teaching in the Lehigh Public Schools sometime in the early 1950's. She was my music teacher from kindergarten through the 12th grade. In high school, I took private voice lessons from her. She loved pink and had a pink house with lots of pink furnishings. I'm sure my love of pink has something to do with that. She passed away several years ago, and there was an auction of her things. My mother and dad went to the auction and bought the doll that's in the carriage below. The doll belonged to Mrs. Parr as a child. She's wearing the original pink flannel pajamas made for the doll many years ago. The bib was not with the doll but she looks cute wearing it.
I keep the doll in the carriage, nestled with the little quilt and the pink crocheted afghan. It sits in my pretty pink bedroom that my daughter loves to sleep in when she comes to visit. Ah, memories are a wonderful thing. Now if I could just remember to label my quilts..........the memory of who made them or where they came from will be a lot easier in years to come!


Friday, June 10

Turn out the lights, the parties over.......

Yes, the end of my birthday/blogaversary celebration has come to an end. It has certainly been fun and I have enjoyed reading the comments, especially those on the "Joy of Quilting post". The book giveaway on that post and two giveaways are still open so check out my posts for the last three days. When a giveaway closes, I edit that entry and add the winners names at the end of each post. Thank you all for stopping by during my celebration. Thank you, too, for new followers who found my blog via QuiltingGallery. If you haven't read my guest blogger post there, then check it out and if you leave a comment, your name will be entered in a drawing for a surprise package. I've been told that I do really nice surprise packages. Just sayin' but those who have received them, give them "high fives". LOL! I did have a little tutorial I was planning to share today on that little blue basket project but it will have to wait a few days because............
As I write this, I am gathering together some projects to take with me for a trip to visit my mom. Behind the celebration here at my blog this week, she has been having some health issues. I'll be going home for a few days so will not be blogging regularly. I'll check in whenever time allows. While I'm away, my dear husband will be at home, "holding down the fort". And keeping him company will be Kaiser the Wonder Beagle, our resident guard dog. Well, maybe. Does this look like a guard dog to you? .............

Not really!  This is a dog who likes a pillow and loves to be covered up. I took this yesterday afternoon as he was taking his nap. He may not look like he would guard anything, but if the doorbell rings or he hears something, he is up and at 'em with blanket trailing right behind him. :-) 
Hope you all have a good weekend!
Sandi

Edit: My mom is doing well. I will return home on Tuesday and back to blogging. Thanks for your thoughts and prayers. :-)
"Peace can be found in the piecing of a quilt."
©SEA 2001-2018