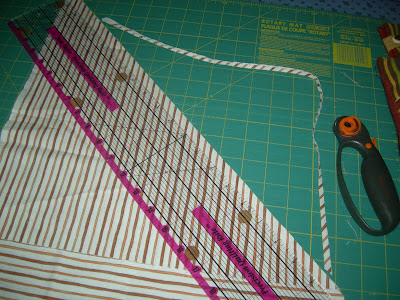
Please read this part carefully and learn from the mistake I made when I sewed this sample topper. I managed to make this mistake twice........once last summer when I made the first topper with the Quilt Minnesota fabric (you'll find three examples of this table topper here) and again just a couple weeks ago with Jacquelynne's "Fruitful Hands" fabrics. Ugh! I was so mad at myself. Here's what I learned.......It's very important to cut your strips on the bias with a single layer of fabric. Do not double it if you plan to piece the strips together. The stripes run two different directions if you cut two layers. And sooooooo, cut carefully!
Step 11.
Cut four 1" strips of the striped fabric on the bias, two that are 18-1/2" long and two that are 20-1/2".
Sew the 18-1/2" long strips to the right and the left of the quilt top and then sew the 20-1/2" strips to the top and bottom of the top. Press.
Step 12.
The final border is 2-1/2" wide and you will need two pieces that are 20-1/2" long and two that are 22" long. Note........because we all sew a slightly different quarter-inch seam, you may need to adjust this final round of strips.
Sew the two shorter strips to the right and left sides of your quilt top and then the longer strips to the top and the bottom. Press.
And now your top is completed................
And it is time to back the table topper, quilt it and bind it.
Step 13.
Cut one 24" square of fabric for backing or ........as I did, you can make your backing by cutting four 12-1/2" squares and sewing them together like this............
Make your quilt sandwich by placing your top, batting and backing together. I use Quilt Spray that allows me to position my pieces and keep them stationery.
Step 14.
Here's that phrase so often stated in quilt patterns......."Quilt as desired". And that's exactly what you should do. Even though I use a quilt basting spray, I also pin the pieces together. I chose to stitch around each pair and then did "stitch in the ditch" along all other seams. Because this is a small tabletopper, I did not wish to do a lot of quilting. I really wanted to see the fabrics and the block design. You may wish to do more machine or hand-quilting, and that's why we say......... "Quilt as desired!"
Step 15.
I cut my binding 2" wide. Most times I cut it 3" wide (for large quilts) but I was short on fabric because of my earlier cutting error, plus I wanted a narrow binding. I pieced several sections together in order to get a piece long enough (I made piece about 100" long so that I would have plenty for my binding) to use for the quilt binding. I found the best binding information at Kaye Wood's site. If you go here and follow her directions, you can obtain perfect mitered corner binding!
And with the binding finished, your tabletopper is ready to be used!
I'll be sharing a variation on this tabletopped in early November when I make another sample with Jacquelynne's Christmas line.......... "O Holy Night!" There will be fabrics to give away so be sure to stay tuned!


4 comments:
Quite beautiful!!
That is gorgeous! I love the striped fabric for the binding!
What a lovely table topper, and so versatile for design changes. Thank you for providing the terrific tutorials! I would love to see the Halloween version, too!
How cute that looks! I love the stripes. That just makes the design perfect.
Post a Comment