Monday, May 30

What's on the line this Memorial Day?

I saved this quilt to share today. It's one of my favorites. It's one of five quilts I designed in 2001 and taught it to a group of friends and in Community Education classe. I did the machine piecing and my friend, Sara Peterson, did the beautiful machine quilting...............

The quilt measures about 36" square and can be used as a wall-hanging or a table-topper. You could do it in any color but I especially like it in patriotic red, white and blue!!!  One day this quilt and the other four in the series will get into pattern format. In the meantime, I just enjoy them "on the line", or on the wall or on my dining room table. :-)

This is Memorial Day here in the U.S. It's a day to remember those who have served our nation's military. They've given their time and often their lives in service to others. I appreciate it  immensely!  My dad has been in my thoughts all weekend. He served in the U.S. Army during WWII. My husband served in the Air Force and many of my high school friends served in the Army or Navy during the Vietnam War. War is not what anyone wants. Sometimes it just becomes necessary. My dad often shared stories of WWII. I never minded hearing them. While it's been three years since he passed away, I still miss him greatly.
It was following his death that I began blogging. I took to the "blogosphere" on Memorial Day, 2008. If you go here, you can see that first post.  For a long time I had wanted to share my creative endeavors with others. Blogging helped me to get beyond the pain of losing him. It gave me something to look forward to, a purpose to my days. Sharing with others helped me get beyond myself..........
At first, I didn't know what I was doing. I would ask my son, Devlin, for advice. He had encouraged me that I could blog. He said I didn't really need his help that there was a tutorial for practically every aspect of blogging and I could do this. He was right. And so, on Memorial Day, three years ago I took the leap and began blogging. And I love it !!! I am so glad Devlin was right and that I could do it!  We need to celebrate this occasion so later on this week there will be some fun stuff that I'll be sharing. 
Right now, though, in memory of my dad, I want to share a special page. It's a memorial tribute that Devlin wrote to fellow members of the Black Mustang Car Club, an on-line group for fellow Mustang enthusiasts. Click here if you'd like to read Devlin's tribute to his Grandpa. My dad was just one of thousands of men who served. I am thankful for every man and woman who sacrifices for the well-being of others. May those that are serving today return safely to their loved ones. My prayer is for peace. A simple prayer for peace.............

Saturday, May 28

Wooly Fun Part Two is here..........

Here's the wooly pincushion I made that was inspired by the Wooly Round Robin. I'm going to show you how to take your wooly piece and make it into a plump pincushion.

In my previous post............ I took the wooly round robin piece and used it to make a sewing box cover.  I started by just doing a running stitch around the perimeter of the piece with Perle cotton. See here. You will do the same to get your pincushion started. In the photo below, I've completed the stitching around the perimeter of the wooly piece and pulled the thread to gather it a bit............


Next, I turned it "inside-out" and gathered the fabric to make a bowl shape. I secured the Perle Cotton so that the bowl shape would be permanent. This is a "guesswork" issue as all wooly pieces may be different sizes. And since there is no right or wrong size to this project, it doesn't really matter.  I placed the bowl shape on the corner section of a piece of wool that will become the base of the pincushion.............
I trimmed around the wooly piece creating a circle. You can "true-up" your circle after you get the intitial shape cut out.
Next, take your bowl shaped wooly piece and pin the wool circle to it, pinning all the way around......................
Then you will stitch all the way around the pinned area. Yes, you may be thinking "I have no opening, how will I stuff this?" My answer would be......."we will make an opening soon but by stitching it together this way, you will get a really even shape that will stuff very nicely". Here is the completed piece all stitched together.............
To make your opening, grab the wool base piece at the center (you could measure if you want, but I just "eye-balled it"). Make a little snip with your scissors at this spot...........
And then make a circle cut in this area about 1-1/2 to 2" in diameter. Now turn your wooly piece inside out and it's ready to stuff. Sorry, I didn't get a photo of it at this stage.  With the piece ready to stuff, just begin filling it with polyester batting, wool or cotton stuffing. The rim of the hole that you cut will stretch some so that is why you only want a 1-1/2 to 2" opening for stuffing.  Stuff the pincushion carefully, but leave a "well" in the middle for the next step. Sorry, this photo is a bit fuzzy.............
I wanted weight in my pincushion so I made the following item. I cut a circle from muslin about 8" in diameter and did a running stitch around it as shown in the photo above. Then I filled it with crushed walnut shells (lizard bedding which can be found at most pet stores) as shown in this photo............
I placed a small circle of batting over the top of the crushed shells and then pulled the running stitch tight and secured it as shown in the photo above. I turned it over and placed it in the "well" of the stuffing in the pincushion...............
I was almost finished at this point. I cut circle from the wool base fabric that was approximately 3/4" larger all the way around the circle opening. See photo above.  I pinned it in place and began to blanket stitch this piece to the wool pincushion base...........
And in this photo above, you can see that the blanket stitching is finished and so is the pincushion. It's all done and I just love it.............
Now you might be thinking.......oh, it's going to be too hot to think about stitching with wool. Well, with summer coming up, there will be family outings and reunions, maybe a summer vacation and when you are out and about............keep your eye out for shops that carry wool and check out thrift shops for wool clothes you can recycle (be sure to wash it all as soon as you get home.......old wool clothes can carry a moth or critter, or two and you don't need that kind of company).  Then when fall and cooler weather arrive, you will have a lovely stash of wooly fabrics so you can make a wooly pincushion, penny rug or wooly applique project! If you have any questions on this project, please let me know.
Have a great day! Cool and rainy here in Minnesota. We were glad we didn't have family outings planned. It's a good day to catch up in the sewing room!
Sandi

Friday, May 27

Wooly Fun Part Two will be posted on.......

 Saturday, May 28th.......

My pincushion was inspired by JoAnn's Wool*Crazy book. I love working with wool or any other fabric and I love to add embroidery and embellishments.  I'll share my method for turning any crazy-quilted piece (can be used for embroidery and quilted pieces, too) into a pincushion. Today, though, my husband and I are out and about so I won't have time to post the photo tutorial until Saturday! I'm sure you are all busy barbecuing anyway. :-) Have a great weekend everyone!
Sandi

Wednesday, May 25

Wooly Fun, Part One

Last summer, I was intrigued by a post on PatSloan'sBlog for a crazy quilted wooly pincushion. The project was based on a book by JoAnn Mullalley (go here for JoAnn's blog and here to order her book) and was a featured product over at Brenda's PumpkinPatchPrimitivesQuiltShoppe. Pat was hosting a Pincushion round robin pincushion exchange that would feature her work, JoAnn's stitching, along with Brenda and Roseanne of Rosebud'sCottage.  It was fun to watch their pincushions develop.  I "knew" Brenda from my Wooly*Buddies Yahoo group, so I e-mailed her and said that if she ever did another Round Robin, I would love it if she'd consider me. She replied that she was planning a second one and so I was in!  You can read the post where I began my project here and today, I can report that my Round Robin piece is finished and is now the lid on a sewing box...........

So who made what on this wooly piece?  After stitching my base, I made the stalk of corn and then my piece went off to Brenda in New Hampshire who added the face of Scarecrow Jack and some pumpkins. The pumpkins are from JoAnn's book WoolCrazy and Scarecrow Jack is from a penny rug design that you can find here at Cath'sPennies blog. The next item added was that awesome barn done by  Linda Hall of PrimitivePiecesByLinda in Florida. I wasn't familiar with Lynda's work until I "met" her through Brenda. I love blogging and Facebook because you can connect with so many people that otherwise you'd never meet!  Behind the barn door is an "H" for Henderson where I live. And the barn sign is so typical of barns here in the Midwest. Just perfect!  From Florida, my piece wound it's way north to Rhode Island to Michelle of RockingChairStitches and she added the woven basket filled with apples. Perfect for our area of Minnesota!

Now if you follow my blog regularly, you may remember that I posted last summer about wooly-fun-comin-up and, yes, that's where my pincushion base began but it had a bit of a "bump" at the start.  I wanted a Fall/Harvest theme so I chose wool bits that I thought would go well with that theme. We were to add the first item and I wanted a cornstalk ready for harvest, so I snipped some wool, started stitching and I ended up with this...........
Yes, it looks like a cactus so I must have been thinking southwest instead of midwest. I decided to start over and took a photo of an Iowa cornfield so I'd get it right. You'd think I would have gotten it right the first time since I grew up in Iowa surrounded by cornstalks. LOL!  You can see the two cornstalks are vastly different.


I rather liked the cornstalk that I had stitched with the bursting ears of corn so I decided I would rip out the base and see if it could be salvaged.  The floss I used for my piece is from TheGentleArt. I absolutely love the colors that they offer!!  It was tedious to rip out the "cactus" aspect of my stalk of corn but I did it and I think it worked. And so, while my pincushion base (above) went off on it's Round Robin journey, I worked on embellishing the piece with the "cactus corn" on it.  And here it is............


Much better looking stalk of corn, don't you think?  I stayed with the Fall theme on this piece because I was already thinking of making a pincushion and a sewing box. I added the crow because crows always bothered the sweet corn my Grandma Goldie planted out on the farm. The pumpkin is the kind I tried to grow but mine were never so nicely shaped. :-)  We have one loan oak tree in our back yard that sheds an abundance of acorns. It stands all alone amidst the maple trees.  The maple leaf is also abundant in our backyard and every yard in our neighborhood. We do, after all, live on Maple Ridge. :-)  I added the basket of apples because they are also in abundance here in the Minnesota River Valley. There are several apple orchards just minutes from our house. These are all my favorite things from Fall which is my favorite season of the year. I'm must admit that after our long, cold winter that I am enjoying spring. I will tolerate summer but I live in anticipation of FALL!


In the photo above, you can see both finished pieces and I had to decide which one would become a pincushion. I really wanted to see the whole design from the piece that went off on it's Round Robin journey, so I decided that one would become the lid on the sewing box and the one that I stitched would become the pincushion. In my next post, I'll show you how I made the pincushion. Right now, I'll share tips on how I made the sewing box.

I started with a plain brown round craft box that can be found at local craft stores or online craft sources. Then I painted it. I chose a deep rich brown and painted the box inside and outside with the color which you see on the inside in the photo below. To achieve the "antiquey" look on the lid and outside of the box, I used a honey-colored paint and sponged it and rubbed it until I had the look I wanted. I let the box dry/cure for almost a week and then I sprayed it with clear matte acrylic spray. I loved the look when it was all done.

To secure the wool scene to the lid, I did the following..........
I traced the lid onto cardboard (the kind you find on the back of a tablet or use posterboard).
Then I cut three pieces of batting (Quilter'sDream poly batting) and lightly glued them to the cardboard circle.

Next, I used two strands of brown Perle cotton to sew a running stitch all the way around the stitched wool piece. See the photo above.
In the photo below, you can see that I pulled the stitching to gather it a bit.........

Next, I slipped the wool stitched piece over the batting covered-cardboard circle. Then I pulled the stitches tight and secured the Perle cotton so that it looked like what you see in the photo above.
The final step was to glue the stitched piece to the box lid............


And here it is completely finished...........

And here are the pair of them.....a finished pincushion and a finished sewing box...........
The pincushion required more patience. It is very similar in assembly to a vintage crazy quilted pincushion that my mother gave me and other pincushions that I've made. Check out this Post where you can see the vintage pincushion and the reproduction one that I made for a Crazy Quilting pincushion swap. Once you've made one pincushion, you can make more!  I can see one made in 30's prints and think I'll have to try that next!  I'll be sharing step-by-step photos for how to turn any stitched piece into a pincushion in my next post.
If you want to get started on your own wool crazy project be sure and check out JoAnn's blog and you will get inspired!
Sandi

Tuesday, May 24

Time out for Tulips!

Last Tuesday, our Bible Study group met at friend Arline's house. She has the prettiest tulips and the loveliest spot where the birds can perch. Hummingbirds love the feeder that hangs outside her window. I took a couple of photos because the tulips were so lovely. Aren't these yellow tulips beauties, though? 


They are in the this little windmill garden and it just makes me think of Holland.  


Pretty, pretty, pretty! I just had to take time out for tulips. Today we meet at Diane's house so I wonder what flowers I'll find there?  I'll have my camera along and will be sure to snap a photo or two of anything colorful and lovely.
Coming up tomorrow .....  it's all about wool and crazy quilting. See ya then........
Sandi

Monday, May 23

What's on the line?

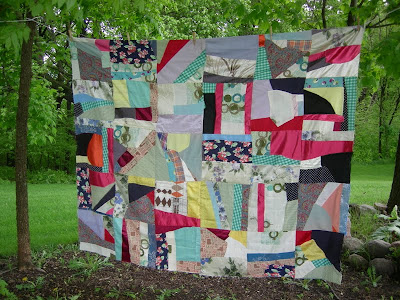
There was a lot of wild and crazy weather in our area yesterday and it made me wonder if I would be able to hang a quilt on the line. But mid-afternoon, there was a bit of a break in the rain and storms and I went out to my little "clothesline in the woods" and took these pictures. This quilt is as crazy as our weather and very unpredictable. I don't know who made it but it's got a little bit of every kind of fabric in it's blocks. 

One thing that can be said for it, is that it's "colorful". Oh, and it's not really a quilt because it's just blocks sewn to fabric and so it's just a "top".  When I first hung it on the line, the wind was calm, so I got the photo above. I wanted a couple more and so, of course, the wind picked up.............
In the photo below, you can see the backing on each block, which in most cases is blue chambray cotton.
The amount of shocking pink satin in this quilt top makes me wonder if it's someone's old prom dress or a really awful bridemaid's dress.
You may also note that there are drapery fabrics in this top that could only have come from the 1950's or 1960's. :-)
I loved watching the quilt top blow back and forth in the wind!
And then the wind died down again..........
and so I took some close-ups..........

My favorite fabric in this old vintage "very, very crazy patchwork" top is the floral with the navy background. It's jersey or some other type of fabric. I cannot imagine who made this but it truly fits the term "crazy quilt"!
Now, I need some advice. This quilt top is unfinished but it needs to become a finished project. I am thinking that it should be "embellished" but how? Should I add embroidery to it and do it only in black perle cotton? Or should I do the embroidery on it in colors that compliment the fabrics? Or should I do nothing and just add a backing and border and be done with it? Oh, and one more thought I had..........maybe I could ask each of my crazy quilting friends to embroider a block area and then note who did which blocks?  Tell me what you think as I think this one needs to have a happy ending and become a finished crazy quilt. Then I think it will need a name. What would you call this very crazy patchwork quilt?

To give you an idea of the wild weather we had here in Minnesota yesterday, here is the sky to the west of us mid-afternoon Sunday. We could see the menacing storm clouds as the rolled north to Minneapolis where the tornadoes hit. It has certainly been a stormy spring.
Just a few minutes after I took the photo above, I took this photo out our back door and looking to the southeast. It was amazing to me that it could be so gloomy to the west and so sunny out to the southeast!

Speaking of sunny......It was like sunshine amidst the rain on Saturday when I went to the mailbox and found these little beauties in a package from my friend, Jane. She's a member of my Wooly Buddies Yahoo group and sent me these lovely handmade treasures as a thank you for such a fun group. And we do have fun, even though most of us have never met. I realized recently that Jane is one of many on-line friends that I have stayed connected with for almost three years. Yahoo groups and blogging is like the pen-pal groups when I was a kid. I just love the work that Jane did on the little needlecase and then the matching scissorscase and the little flower that holds emery for sharpening pins and needles. My thanks have been sent to Jane, but I'll say it again...Thank you, Jane!!
That's all for this day! I'll have some more crazy quilting things to share this week and next week. Plus, I'm going to go back through my photos that I've taken lately and see what I may have missed. I have some spring flowers to share tomorrow that could inspire a future design or two!
Have a great Monday!
Sandi

Thursday, May 19

Button, Button, whose got the button?

This bag has the buttons! Lots of them and I just love it! This is more fabric from Jacquelynne's "Sewing Room Social".  This time I used just five fabrics from the line. The mug rugs that I made and shared were done in all the pastel shades, no brown, no red but when you add the brown and the red ......... wow! what a difference it makes! The colors just seem to "pop"!
I took these two photos just before I sent this bag off to my swap partner. The morning sun was shining in when I took the one above, not so in the one below.  So, who will get this bag?  Well, it is on it's way somewhere but I can't tell you where. It's a secret swap so the recipient has no clue from whom she will receive a bag!  And while all the swap partners have been assigned, you can check out the tutorial for this project by visiting QuiltingGallery where you will find a link to the tutorial by designer Geta and to the Flickr group where there are so many more cute bags!!  
You can see in the photo below that this is a nice size bag. Yes, I know it says "basket swap" but because of how I pieced my handles, they got a little long and so this is more of a bag, than a basket. :-) I added a couple goodies and away it went in the mail this past Monday morning.
I liked the bag so much that I made one for me. I really like that button fabric! And I am working on some accessories with some of the scraps, so perhaps by my next post I will have some more "button, button" projects to share!
Sandi

Tuesday, May 17

There's a Shop Hop going on in our neighborhood..........

and if you go to each shop that is participating in the "hop", you'll get a free pattern for a tablerunner. And guess what? This is the tablerunner I made and it's the free pattern that you will get if you stop into FireflyQuiltShop. 


And, if you click on the link above for Firefly, you will find the list of shops that are participating. It's called the "Sew Close to Home Shop Hop" and it's on now through this Saturday.
My tablerunner design was born this past winter when I was sketching designs just for the fun of it. I enjoyed using 5" charms for that candlemat I made last fall and started playing with some in batiks. And this is what I ended up with! If you are interested in a kit for this project, just contact Janice at FireflyQuiltShop (the pattern is not posted on the website, you'll need to e-mail or call the shop if interested in the pattern/kit). The pattern is free if you stop in the shop. It will be available for sale at the end of May and will include another flower design and an autumn leaf for applique. I have finished the applique on the runners and am ready to do the quilting.
I have really enjoyed working with these batik fabrics. Actually, I enjoyed it so much that I have a full-size quilt design in my head that I really want to make. I'm just trying to figure out where I will find the time to do it. :-)
Later this week, I'm planning to visit the other shops that are "hopping".  I got my card marked at Firefly last Friday and then went over to River City Quilts, too. The last shop hop that I did was in 2000 when I did the Twin Cities Shop Hop. It's time to do another one, even though the cost of the gas puts a serious dent in the dollars I might spend on fabric. :-)
Of course, I'll share photos if I find pretties that you all might like to see.
Have a sweet day!
Sandi

Monday, May 16

What's on the line?

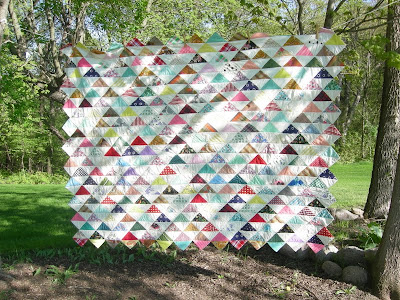
Today's quilt on the line is a family heirloom. It's this pretty triangle quilt that was made by my Grandma Goldie. It was most likely made in the 1950's. I've shared this quilt before but never "on the line". Yesterday was an almost perfect day for taking photos.........temps in the 60's, sunny and a slight breeze. Just perfect for hanging quilts on the line...........

All the triangles on this quilt are hand-sewn. They started as cotton squares that have a flannel square inside each cotton square, then folded in half and sewn into strips of triangles. Then the strips are sewn together and it was hand-quilted. Here's a close-up of the quilt...........

The construction of the quilt my Grandma Goldie made is almost identical to this quilt below, one that my dad bought at auction and then my mom and dad gave it to me for a Christmas gift. This quilt is the only quilt that I've ever had appraised. It was appraised by Jean Carlton, a certified quilt appraiser. Classified as a "youth quilt", it has more value than a larger quilt because youth and children's quilts generally do not survive in such good condition. It was most likely made in the late 1940's to 1950's. I love both of these quilts because they are pretty but even more because the stitches on the one above were made by my Grandma, my dad's mother, and the one below, caught my dad's eye at an auction which makes me wonder........did he remember the one above? That quilt was tucked away and didn't "surface" until my grandparents auction in the late 1990's. It was a couple years later, that my dad bought the one below.........
To read more about these quilts you can go to these past blog entries.......this first blog entry was posted shortly after I began blogging and just a little over a month after my dad passed away.........go here for that post. And the second entry, shows my friend Carol with triangles and strips that show how this quilt is made. She received a box of pieces for this quilt from a neighbor who called it a "Depression Quilt". I always called the quilt from my dad the "Puzzle Quilt" because for the longest time, we just weren't quite sure how it was constructed. You see, it's the same on both sides of the quilt, totally reversible!  Once you check out the post with Carol's examples you'll see that making one of these would be a great "carry-along" project! Three other friends......Sue, Carol, and Pandora have all made variations of this quilt. Go here to see Carol's examples and you'll see how you can start your own triangle quilt. And as I write this, I'm thinking.........this could be a great project to use with my GO! Baby. I would need to order a 4" die and a 3-1/2" die, and then I could fill a bag with squares for a "carry-along" project. What an idea! :-)
Tomorrow I'll be sharing more on that batik tablerunner. With the Blogger "glitch" last week, I am a little "off-schedule" on my planned posts but it won't take long to catch up. I am just happy it's all fixed and very appreciative of the ability to blog and share my creative fun. Thanks, Blogger!!
Have a good Monday everyone!
Sandi

Friday, May 13

Gotta get GO!ing!!!

And the winner is..........Deborah in Atlanta! E-mail has been sent to her and package will be on it's way tomorrow!
Edit.....Because Blogger was unavailable for most of the last two days, I am extending the deadline to enter the little giveaway for Jacquelynne's charm pack and fat quarters. You have until noon Sunday to leave your name and e-mail contact. For those of you who signed up on Wednesday, while your comments were not restored when Blogger had problems, I did get them in my e-mail inbox and you are entered in the drawing! So, back to the post that I made on Wednesday...........

No, I am not going to Market. I am right here in my sewing room. Instead, it is time to get GO!ing and share how happy I am with the GO! Baby that I received from AccuQuilt a few weeks ago. I received it shortly before the DayTreat event that I hosted in April. It came in verrrrry handy!!! You'll see why in a minute. Once the DayTreat was over, though, holiday and family life became very busy behind the scenes of my blog and so I must apologize that it has taken me so long to share about this clever little gadget. Actually, it's more than a gadget. It's a super-gadget because it clearly makes cutting multiple shapes very easy to do and very accurate! As you may remember, I made a mug rug for everyone that attended my DayTreat. I made them from 5" charm squares and used my GO! Baby to make it happen!
The GO! Baby was much easier to use than I anticipated. I mean much easier!!! I am always intimidated by machinery. No need to have worried about that with the GO! Baby. You basically just take a piece of fabric that is slightly larger than the area you are going to cut..........
You place it over the foam covered die plate (in photo above) and then place the cutting mat over the top of that (in photo below) ......

Then you just turn the handle...............

and voila!!!! you have perfectly cut 5" charm squares!!!
The little bit of scraps that you see here are all that are left after the squares are cut. You can also see that I am placing the pieces on yellow card stock that eventually became the finished mug rugs.............

Each mug rug begins with the 5" charm and then I cut several more charms into strips from 1" to 2" widths and sewed those together. I cut the sewn strip sets into 5" x 4-1/2" pieces and sewed them to the 5" squares, added borders, then batting and backing, and a bit of quilting and they were done!!
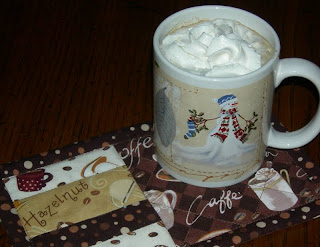
This is the mug rug that got me inspired to stitch one for each guest........
And if you want to know more on how to make a mug rug, just go here. It's my post about my mug rug collection and contains links to my various projects. That post had a giveaway that is now closed but perhaps you'd like to have a little chance for a prize, too. Thanks to Jacquelynne over at TheNobleWife, I have a charm pack and a couple of fat quarters of her "Sewing Room Social" fabric line that I used for the DayTreat mug rugs and one of you could be the lucky winner. And I also have some of the coffee print fabric that the mug is sitting on. You'll get a bit of that, too.  Just leave me your name and e-mail by 11:59 p.m. on Friday the 13th. Who says the number 13 is unlucky?  It could be your lucky Friday!!!  I'll post a winner on Saturday, May 14 at noon. 
I have more projects "in the works" with my GO! Baby and will share soon! Thanks AccuQuilt for the chance to work with this great "Super-Gadget"!!!
Have a great day!!
Sandi
"Peace can be found in the piecing of a quilt."
©SEA 2001-2018