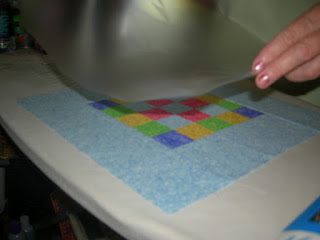
And it works great, so much better than the little one that I have had for a long time! This was a project that I started over a year ago but all this health and doctor stuff put a real dent in my quilty projects. But now I am catching up, and especially since I hired my neighbor, Sue, to come on Tuesday mornings and help with projects. She had never worked with iron-on vinyl so this was a fun, and also a learning experience for her. We took photos as we did it and here's how you can make one, too!
First, you need a vinyl adhesive backed floor tile like this.........
Then, you need a GO! Baby like this.......
You'll need to purchase Heat 'n Bond Iron-on Vinyl and some 1/2" double sided clear adhesive tape. Then find some great fabrics in your stash, stack up a few and roll them through your GO! Baby.......
If you don't have a GO! Baby, check out the AccuQuilt website for more info. The die I used was one that cuts six- 2" squares. Remove the squares from the GO! cutter and lay-out a pattern that is pleasing to you. I liked this lay-out............
Begin sewing your squares into rows..........
When the rows were complete, I pressed all seams open............Sew your rows together and you will have a finished block..........
Next step is to add borders. I added strips that were 3-1/2" wide......
You'll add side borders first, then the top and bottom borders to complete the finished block........
Read directions carefully on the Heat 'n Bond Iron-On vinyl. I really like this product and have used it successfully on a couple of projects I made for my grandson........a team football pillow and a notebook for his favorite college team.
Cut a square of the iron-on vinyl that is just slightly larger than your quilt block.......
then peel away the backing paper but do not discard it. You will need it for another step. Carefully place the vinyl with adhesive side to right side of fabric.Smooth with your hands, starting in the center and working out to the edges. Use a brayer to smooth out any bubbles.
Flip your block over and place the paper square over the reverse side of your block. Press, following package instructions.
Remove paper and press again, per package instructions.
Let cool...............and then you can peek and see if it worked........
And it did!! So, the next step is to remove the paper from the back of your floor tile........
Place your quilt block face down on your work surface, then very carefully center the tile over the quilt square and press in place. Flip the block/tile over and smooth with your hands and brayer.
Take the block/tile to your cutting board and trim 1/2" all the way around the square.........
Next, place double-sided tape along outside edge of all four sides of tile.
Carefully fold edge of fabric onto double-sided tape. Do one edge, then it's opposite edge. I clipped the excess from the corners before making the last two folds.
Here's the brayer I used during this project..........
The last step is to cut a square of woolfelt that is 1/4" smaller on all edges than your finished square tile.
I used Tacky glue along all edges, then flipped the piece of woolfelt and placed it over the tile design.
I like to press a warm iron to the glued felt surface but I place a dishtowel over the glued area so I do not get glue on my iron soulplate.
The felt keeps the Giant Mouse Pad from slipping all over my desk. ;-) My mouse moves smoothyly over the vinyl surface even though there are seams in the quilt block.
I am really pleased with how this project worked out. I was not sure it would be successful so Plan B was going to be a vinyl covered totebag if the mousepad idea didn't work. LOL! I may yet make a totebag, as I really like these fabrics and the block lay-out. I might even use the lay-out for a quilt project! That's another project for another day!
I was tired when we finished this and almost took a nap on my front porch. I'm thinking that the summer cold that my husband had last week, may be knocking on my nose. Ugh! Hoping a good night's sleep chases away any sign of a summer cold. Perhaps it will be too hot to catch a cold!
I have another GO! Baby project to share in a few days. It's one I did with my niece last summer. As I said........I'm catching up on things!
Sandi


9 comments:
THANKS for the neat idea--- could use some leftover blocks to.
GREAT idea and terrific step-by-step photos of the process!
Wonderful idea! Those little mouse pads are never big enough. I love the fabrics you used.
Hopefully that Summer cold stays away.
What a great idea! Thanks for sharing. Hope you don't catch that cold.
That is absolutely adorable!!!! I think I need to make one. Thanks for the tutorial.
Hi Sandi
Thats a clever idea - but where did you get the self adhesive vinyl ? I do remeber anywhere here in DK as to getting hands on that!
By the way i did check all your book maks on yor info page - and I did copy them because it's my plan to go over them one by one and maybe bookmark them myself...;-)
I do have a list of over 3500 bookmark - always something to look at IF one is bored someday.
Hugs from Lone
In Denmark
Hi again :-)
I ment I do not remember anywhere to get it of course...;o)
Turned out wonderfully!!
Nicely done Sandi and a great photo tutorial to boot.
Thanks for sharing the idea.
Post a Comment