Yesterday was the first official day of summer according to the calendar. I should be working with summery fabrics but I got caught up in my wooly stuff and just had to play with it! Remember the shapes I cut while waiting for my mom at the doctor? Well, here they are on my vintage wool crazy quilt piece............
I used a fabric glue stick to adhere them to the wool and then basted them with white thread to hold in place. I wanted them in place so that I could just pick up this piece and stitch whenever I have time. I realized as I positioned the pieces that I need a few things.....a snowman, a pair of mittens, a log cabin, a teddy bear, a dog, etc. etc. My piece will not be very primitive. I just don't do primitive very well. Instead, I am sort of "grade school". LOL! I love my shapes, though, and so as long as I'm happy with what I end up with then that's all that counts!
Now, I also showed you, a wool piece that looked like this..........
Well, while I was at my mom's and we sat and chatted and watched TV........I was also stitching cross stitches on this wooly piece.........
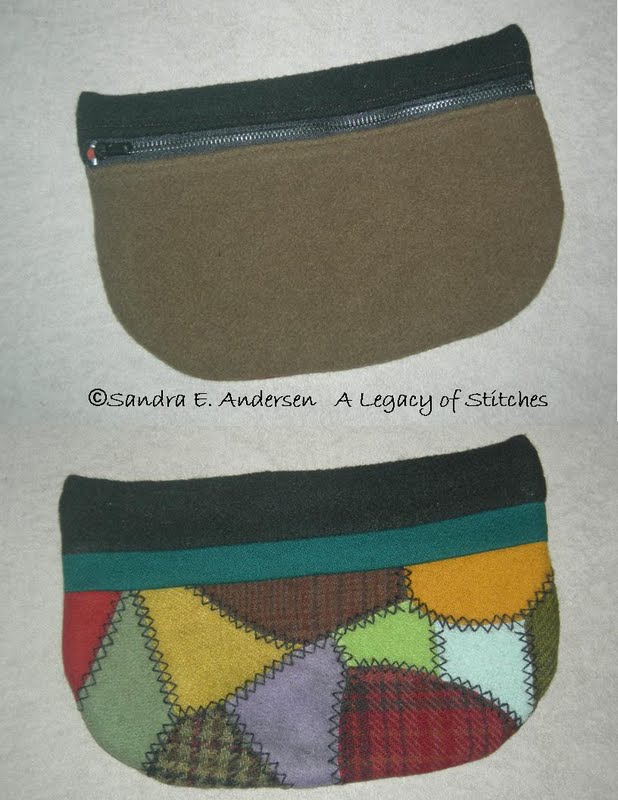
I could see a small zippered case from this and so I thought I'd share a few steps in how I made it, once the piecing and cross stitch was finished. This is not a detailed tutorial like some that I've shared. Instead, it requires a free spirit, good sewing skills and is more of an "inspiration" tutorial. That's because sometimes, I like to take fabrics and just start cutting and stitching and see what develops. If you like to do this, then you may enjoy trying something similar with your wool (or cotton) scraps.
Once I had my basic piece stitched, I cut a piece from brown wool that was the same size. My particular case measures approximately 9" unfinished. I cut a strip of teal that was 1-1/2" x 9" and a strip of black that was about 4" x 9". I sewed the teal strip along the top of the pieced case section. I also cut two lining pieces and made them extra long at the top.
After I sewed the teal strip in place, I added the black strip of wool. Then I sewed the zipper in place. Again, I mention that this is not a detailed tutorial but merely the steps I took to make this case. There are many sites that share zipper tutorials.
Once the zipper was stitched in place, I folded the entire piece in half and stitched it together. Tip here.......leave your zipper open halfway so that you can turn the piece inside out.
When you turn the piece inside out, you can add the lining. I just slipped it in the case and in the photo above, the pins are holding the lining in place along the zipper. I hand-stitched this side and then when I was finished with that, I pinned the other side of the lining in place along the inside of the zipper. This is why this is not a detailed tutorial. Taking pictures of this step was almost impossible. One of those, "easier shown in person" type moments. :-)
Once that lining is hand-stitched in place, you can zip up your case and it will look like this ...........
And on the side with your wool patchwork, it will look like what you see in the photo above. This would be a good "hands-on" class project. I really felt after I got into it that it was easily completed but difficult to capture in photos. However, if the project offered you some inspiration then that is well and good!!
I've added this case to my sewing box and will keep scissors, needles and other sewing related items in it so I have it all handy when I'm stitching. I'm hoping to finish that wooly crazy quilt piece by the end of the summer. When Labor Day rolls around, I'll let you know if I succeeded or not. Summer is short here in Minnesota, so I am thinking those summery fabrics are at the top of my list for today. Next post.......I'll finally get to the "summery, tutti-fruiti made with my GO! Baby" project!!!
Back soon............
Sandi


7 comments:
Super cute case Sandi.
It would make a wonderful class project and so handy as well.
I like your woolly case. Your instructions are clear except for the zipper, and the package instructions should take care of that. Also, as you say, many books deal with this, especially those with purse/tote designs. I will be making a case like this before long, but in patchwork scraps from a bag project.
I look forward to the Go Baby blog. I plan to ask Santa for one this fall.
Owl Lady
Love the wool pieces. The case is really great. I love the way it came together. It will be really handy for your hand sewing supplies.
Yes, that would make a great quilt club program. You mention summer...as you know I'm not sure it has arrived yet. Maybe this weekend?
I often work in the same way ... something inspires me and I just sew this piece to that, and eventually it turns into something ! :) Thanks for sharing .. I love your little zipper bag!
What an incredible project and I love the idea of a case like that Sandi!
Micki
Post a Comment